Contents
IngredientsFor the chickenFor the balsamic sauceFor the vegetablesFor finishingInstructionsStep 2: Prepare the VegetablesStep 3: Mix the Balsamic SauceStep 4: Heat the PanStep 5: Brown the Other SideStep 6: Cook the Onion and Bell PeppersStep 7: Add the Mushrooms and ZucchiniStep 8: Add the Cherry TomatoesStep 9: Pour in the Balsamic SauceStep 10: Return the Chicken to the PanStep 11: Simmer Until the Chicken Is CookedStep 12: Allow the Sauce to Develop Its Final TextureStep 13: Finish with Fresh HerbsStep 14: Serve the One-Pan Balsamic Chicken
Prep time, or any evening when you want something satisfying without having to wash a pile of dishes. The chicken develops a golden-brown exterior while remaining tender inside, and the balsamic sauce becomes glossy and flavorful as it simmers with the juices from the chicken, tomatoes, and vegetables. The best part is that this recipe uses simple ingredients that are easy to find in most grocery stores. You can
Cook timeis approximately 25–35 minutes, depending on the thickness of the chicken and the type of pan used.
Total timeis approximately 45–55 minutes. This recipe serves four people and can be adjusted easily for a smaller or larger household. The recipe is suitable for a weeknight dinner, a casual gathering, or a meal that feels special without requiring complicated
Servings.
Ingredients
For the chicken
- 4 boneless, skinless chicken breasts, approximately 150–200 grams each, or 4–6 boneless chicken thighs
- 2 tablespoons olive oil
- 1 teaspoon salt, or according to taste
- ½ teaspoon freshly ground black pepper
- 1 teaspoon garlic powder
- 1 teaspoon onion powder
- 1 teaspoon dried Italian seasoning
- ½ teaspoon smoked paprika
- ½ teaspoon dried oregano
- ¼ teaspoon red pepper flakes, optional
For the balsamic sauce
- ⅓ cup balsamic vinegar
- ½ cup low-sodium chicken broth
- 1 tablespoon honey or pure maple syrup
- 1 tablespoon Dijon mustard
- 4 garlic cloves, finely minced
- 1 tablespoon olive oil
- 1 teaspoon dried Italian seasoning
- ½ teaspoon dried thyme
- ¼ teaspoon freshly ground black pepper
- Salt to taste
For the vegetables
- 1 medium red onion, cut into wedges
- 1 medium zucchini, sliced into half-moons
- 1 red bell pepper, cut into strips
- 1 yellow bell pepper, cut into strips
- 1 cup cherry tomatoes, halved
- 8 ounces mushrooms, sliced, optional
- 1 tablespoon olive oil
- ½ teaspoon salt
- ¼ teaspoon black pepper
- ½ teaspoon dried oregano
For finishing
- 2 tablespoons freshly chopped parsley
- 2 tablespoons freshly grated Parmesan cheese, optional
- A few fresh basil leaves, optional
- 1 teaspoon lemon juice, optional
- Additional black pepper to taste
Advertisement
Instructions
Step 2: Prepare the Vegetables
- Wash the vegetables thoroughly and dry them.
- Cut the red onion into medium-sized wedges. The pieces should be large enough to hold their shape during cooking without becoming completely soft.
- Slice the zucchini into half-moons approximately ½ inch thick. Very thin slices may become mushy, particularly if they are simmered in the sauce for too long.
- Cut the red and yellow bell peppers into strips. Remove the seeds and white inner membranes before slicing.
- Halve the cherry tomatoes. If they are particularly small, you can leave some whole, but halving them helps their juices combine with the sauce.
- If using mushrooms, wipe them clean with a damp paper towel or rinse them briefly and dry them well. Slice them into pieces of roughly equal thickness.
- Keep the vegetables in separate groups or bowls if possible. This allows you to add them at different stages according to how quickly they cook.
- Onions and bell peppers generally need more time than zucchini, while tomatoes soften relatively quickly and can release a substantial amount of moisture.
Step 3: Mix the Balsamic Sauce
- In a medium bowl, combine the balsamic vinegar, chicken broth, honey, Dijon mustard, minced garlic, olive oil, Italian seasoning, thyme, and black pepper.
- Whisk everything together until the mustard and honey are distributed throughout the liquid.
- Taste a tiny amount of the uncooked mixture if desired, keeping in mind that the finished sauce will taste different after cooking. At this stage, the vinegar may seem quite sharp, and that is normal.
- As the sauce simmers, some of the liquid evaporates, the flavors become more concentrated, and the sweetness, acidity, and savory ingredients begin to blend.
- If your balsamic vinegar is particularly sweet, you may need less honey. If it is very sharp, the full tablespoon of honey can help create a more balanced result.
- Set the sauce aside.
- Mixing it before cooking ensures that all the ingredients are ready when you need them. This is particularly helpful because garlic can burn if you pause for too long while preparing the sauce in a hot pan.
Step 4: Heat the Pan
- Place a large skillet over medium-high heat.
- Allow it to warm for approximately 1–2 minutes, depending on the pan and your stove. Add two tablespoons of olive oil and swirl the pan gently to coat the bottom.
- The oil should look fluid and shimmer slightly. It should not produce heavy smoke.
- Carefully place the seasoned chicken in the pan, leaving a little space between the pieces.
- If the chicken does not fit comfortably, brown it in batches rather than forcing all the pieces into the skillet.
- When the chicken touches the hot pan, you should hear a gentle sizzling sound. If there is no sizzle, the pan may not be hot enough. If the oil is smoking heavily, reduce the heat.
- Allow the chicken to cook undisturbed for approximately 4–6 minutes on the first side, depending on its thickness.
- Do not repeatedly move the chicken around. Leaving it in contact with the pan helps develop a golden-brown surface and builds the savory flavor that will later enrich the sauce.
Step 5: Brown the Other Side
- Once the first side has developed a golden crust, carefully turn the chicken with tongs.
- Cook the second side for another 3–5 minutes.
- The chicken does not need to be fully cooked at this stage. It will finish cooking later in the sauce.
- The goal is to create color and flavor without drying out the meat.
- If the chicken sticks firmly to the pan, give it another short moment before trying to turn it. Properly browned meat often releases more easily once a crust has formed.
- Transfer the chicken to a clean plate.
- Keep the pan on the stove because the browned bits left behind contain valuable flavor. These small pieces of caramelized seasoning and chicken juices will dissolve into the sauce and make it taste richer.
- Use a clean plate for the browned chicken rather than the plate that held the raw meat.
Step 6: Cook the Onion and Bell Peppers
- Reduce the heat to medium.
- Add the red onion and bell peppers to the same pan. If the pan looks dry, add a small splash of olive oil.
- Stir the vegetables gently, using a wooden spoon or spatula to loosen some of the browned bits from the bottom.
- Cook for approximately 4–5 minutes.
- The onion should begin to soften, while the bell peppers develop a brighter, more aromatic smell.
- You do not need to cook the vegetables completely at this point. They will continue cooking after the sauce is added.
- If the pan has very dark, burnt residue rather than ordinary golden-brown bits, reduce the heat and remove the burnt pieces before proceeding. Burnt residue can make the balsamic sauce bitter.
- Otherwise, allow the vegetables to absorb the flavors remaining in the skillet.
Step 7: Add the Mushrooms and Zucchini
- If you are using mushrooms, add them after the onion and peppers have started to soften.
- Cook the mushrooms for approximately 3 minutes, stirring occasionally. They will release some moisture and gradually begin to brown.
- Next, add the zucchini and sprinkle the vegetables with salt, black pepper, and dried oregano.
- Continue cooking for another 2–3 minutes.
- The zucchini should begin to soften around the edges but should still hold its shape.
- Avoid stirring too aggressively, because the zucchini can break apart when it becomes tender.
- If the pan is crowded, some vegetables may release water instead of browning. This is not a problem for the finished dish, but you may need to let the liquid evaporate briefly before adding the sauce.
Step 8: Add the Cherry Tomatoes
- Add the halved cherry tomatoes to the pan and stir them gently into the vegetables.
- Cook for approximately 1–2 minutes.
- The tomatoes should begin to warm and soften, but they do not need to collapse completely.
- As they cook, their natural juices contribute sweetness and acidity to the sauce. They also create small pockets of bright tomato flavor throughout the finished dish.
- You can use red, yellow, or mixed-color cherry tomatoes.
- If cherry tomatoes are unavailable, use a few chopped ripe tomatoes. Remove excess watery seeds if the tomatoes are particularly watery, although this is not essential.
Step 9: Pour in the Balsamic Sauce
- Reduce the heat to medium-low.
- Pour the prepared balsamic sauce into the skillet over the vegetables.
- The liquid may bubble as it reaches the hot pan. Stir gently to combine the sauce with the vegetables and loosen the remaining browned bits from the bottom.
- Allow the sauce to simmer for approximately 2–3 minutes.
- During this time, the vinegar’s sharp aroma will soften, the garlic will become fragrant, and the broth, honey, mustard, and herbs will begin to form a unified sauce.
- Avoid boiling the mixture too vigorously. A gentle simmer is sufficient and helps the sauce reduce without scorching the garlic or concentrating the vinegar too aggressively.
- If the sauce appears unusually thick at this stage, add a small splash of chicken broth.
- If it seems thin, allow it to simmer uncovered for another minute or two before returning the chicken to the pan.
Step 10: Return the Chicken to the Pan
- Carefully place the browned chicken back into the skillet.
- Arrange the pieces among the vegetables so that each portion has contact with some of the sauce.
- Spoon a little sauce over the top of every chicken piece.
- The chicken should sit partially surrounded by liquid rather than being completely submerged.
- This allows the top surface to retain some of its browned character while the underside absorbs the flavors of the sauce.
- If you have a lot of vegetables, move them around the chicken so that they are distributed evenly across the pan.
- Bring the sauce back to a gentle simmer.
- Cover the skillet with a lid, leaving a small opening if necessary to prevent excessive bubbling. If you do not have a lid, you can cook the dish uncovered while checking the sauce and chicken more frequently.
Step 11: Simmer Until the Chicken Is Cooked
- Reduce the heat to low or medium-low, depending on your stove.
- Cook the chicken gently for approximately 8–15 minutes, depending on the thickness and type of meat.
- Thin chicken breasts may finish sooner, while thick breasts and larger thighs can require additional time.
- Turn the chicken once during cooking if needed, and spoon sauce over the pieces.
- Keep an eye on the liquid. If the sauce becomes too thick before the chicken is cooked, add two or three tablespoons of chicken broth or water.
- If the sauce is still thin near the end of cooking, remove the lid and let it simmer gently for a few minutes.
- The most reliable way to check doneness is with a food thermometer inserted into the thickest part of each piece. Chicken should reach an internal temperature of 165°F (74°C).
- Do not rely solely on the color of the outside or the appearance of the sauce to judge whether the chicken is fully cooked.
- Once the chicken reaches the correct temperature, remove the pan from the heat.
Step 12: Allow the Sauce to Develop Its Final Texture
- When the chicken is cooked, check the consistency of the balsamic sauce.
- Ideally, it should be glossy and lightly thickened, coating the chicken and vegetables without becoming sticky or syrupy.
- If the sauce is too thin, transfer the chicken temporarily to a clean plate and simmer the sauce uncovered for 2–4 minutes.
- Stir occasionally to prevent the honey and balsamic vinegar from sticking to the bottom of the pan.
- Return the chicken to the sauce and turn the pieces gently to coat them.
- If the sauce is too thick, add a small splash of warm chicken broth and stir until it reaches the desired consistency.
- Remember that the sauce will thicken slightly as it cools, so there is no need to reduce it excessively.
- A good balsamic sauce should taste balanced rather than overwhelmingly sour, sweet, salty, or garlicky.
Step 13: Finish with Fresh Herbs
- Sprinkle the chopped fresh parsley over the chicken and vegetables.
- If desired, add fresh basil leaves and a small amount of grated Parmesan cheese.
- A teaspoon of lemon juice can brighten the finished dish, particularly if the balsamic vinegar is relatively sweet.
- Taste the sauce before adding extra salt. The broth and the natural reduction of the sauce may already provide enough seasoning.
- Add freshly ground black pepper if you prefer a slightly stronger pepper flavor.
- Let the dish rest for approximately 3–5 minutes before serving. This brief rest gives the juices time to settle and allows the flavors to come together.
- Avoid leaving the chicken at room temperature for an extended period.
Step 14: Serve the One-Pan Balsamic Chicken
- Bring the skillet directly to the table if it is suitable for serving, or transfer the chicken and vegetables to a warm serving platter.
- Spoon the balsamic sauce generously over the chicken.
- Arrange the vegetables around the edges and finish with a little extra parsley.
- Every serving should include chicken, a selection of vegetables, and enough sauce to flavor the accompanying side dish.
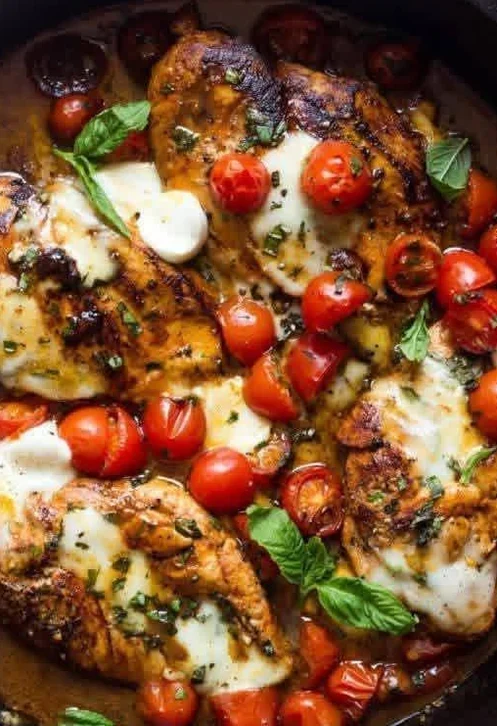
- For an attractive presentation, place the chicken breast slightly off-center and arrange the red and yellow peppers, tomatoes, and zucchini around it. The colorful vegetables contrast beautifully with the dark, glossy sauce.
- Serve immediately while the chicken is warm and the sauce is still fluid.
Advertisement
Advertisement