Contents
Prep Time: 10 minutes
Prep time10 minutes
Cook time12–15 minutes Find Recipes
Total time25 minutes
Servings2 large chicken breasts
Ingredients
For the Chicken:
- 2 large boneless, skinless chicken breasts (approx. 8 oz each)
- 1/2 cup mayonnaise (Full-fat is recommended for best results, though light mayo works)
- 1 tablespoon Dijon mustard (Optional, for tang)
- 1 cup Panko breadcrumbs (Japanese-style breadcrumbs are key for maximum crunch)
- 1/2 teaspoon garlic powder
- 1/2 teaspoon onion powder
- 1/2 teaspoon smoked paprika (adds a beautiful color and depth)
- 1/4 teaspoon salt
- 1/4 teaspoon black pepper
- Olive oil spray (or avocado oil spray)
Optional Garnish:
- Fresh parsley, chopped
- Lemon wedges
Advertisement
Instructions
Phase 1: Preparation (Intensity: Low)
- 1. Prepare the Chicken: Start by patting your chicken breasts dry with a paper towel. Moisture is the enemy of a crispy crust; if the chicken is wet, the breading will steam rather than fry, resulting in a soggy texture.
- Place the chicken breasts between two sheets of plastic wrap or parchment paper. Using a meat mallet or the bottom of a heavy skillet, gently pound the chicken to an even thickness of about 3/4 inch. This ensures even cooking —preventing the thin ends from drying out before the thick center is cooked through. Find Recipes
- 2. Set Up Your Breading Station: Get three shallow bowls or plates ready.
- Bowl 1: Mix the mayonnaise and Dijon mustard (if using) until smooth.
- Bowl 2: Mix the Panko breadcrumbs, garlic powder, onion powder, smoked paprika, salt, and pepper.
- Bowl 3: Leave empty (this is for the finished breaded chicken).
Phase 2: The Breading Process (Intensity: Low)
- 3. The Mayo Coating: Using a brush or your hands (gloves are handy here), coat each chicken breast generously with the mayo mixture. Ensure the entire surface is covered. The mayo acts as the glue and the fat source for crisping.
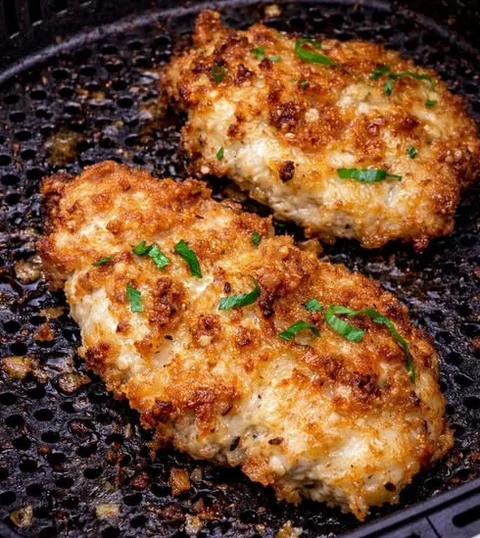
- 4. The Panko Press: Transfer the coated chicken into the Panko mixture. Here is the critical technique: Press the breadcrumbs firmly onto the chicken. Don’t just sprinkle them. Use your hands to press the crumbs into the surface and edges. Turn the chicken over and repeat. You want a thick, complete layer of crumbs. If you see any bare spots, pat more crumbs on.
- 5. Rest the Breading: Place the breaded chicken on a plate and let it rest for 5-10 minutes while you preheat the air fryer. This short rest helps the mayo set slightly, ensuring the breading stays locked on during the air frying process.
Phase 3: The Air Frying (Intensity: Medium)
- 6. Preheat: Preheat your air fryer to 400°F (200°C) for 3-5 minutes. Preheating is crucial for that immediate “sear” on the crust.
- 7. Arrange: Lightly spray the air fryer basket with oil. Place the chicken breasts in a single layer. Do not overcrowd. If your air fryer is small, cook the chicken in batches. Overcrowding blocks airflow, which results in soggy breading.
- 8. Spray the Top: Lightly spray the top of the breaded chicken with oil. This helps the Panko brown nicely. Be careful not to use too much, or it will burn the crumbs.
- 9. Cook – First Round: Cook at 400°F (200°C) for 8 minutes . Intensity Note: This is the high-heat phase. The air fryer is blasting hot air to set the crust.
- 10. Flip: Open the basket and flip the chicken breasts using tongs. Be gentle. Spray the new top side lightly with oil.
- 11. Cook – Second Round: Return the basket to the air fryer and cook for another 4–6 minutes at 400°F (200°C) . The total cook time is 12-15 minutes, depending on the thickness of your chicken.
Phase 4: The Check & Rest (Intensity: Low)
- 12. The Safety Check: The chicken is done when the internal temperature reaches 165°F (74°C) . You cannot eyeball chicken safety; use a meat thermometer. The juices should run clear, and the crust should be a deep golden brown.
- 13. Rest: Transfer the chicken to a cutting board or plate and let it rest for 2-3 minutes . This allows the juices to redistribute. If you cut into it immediately, you will lose the moisture to the cutting board.
Advertisement
Nutrition
Calories: 420 kcal · Protein: 45g · Fat: 18g · Carbohydrates: 14g Dietary · Saturated Fat: 3g · Fiber: 1g · Sugar: 1g · Sodium: 520mg
Advertisement