
Melt-in-your-mouth homemade butter mints that bring back treasured holiday memories
Remember those soft, pillowy peppermint butter mints from grandma’s holiday table? The ones that melted on your tongue and filled the room with that wonderful minty sweetness? These little peppermint pillows take you straight back to Christmas gatherings, the kind where a glass dish full of soft butter mints always sat beside the fudge and sugar cookies. Now you can make these old-fashioned Christmas mints right in your own kitchen and create new memories while honoring the old ones!
Why These Homemade Butter Mints Are So Special
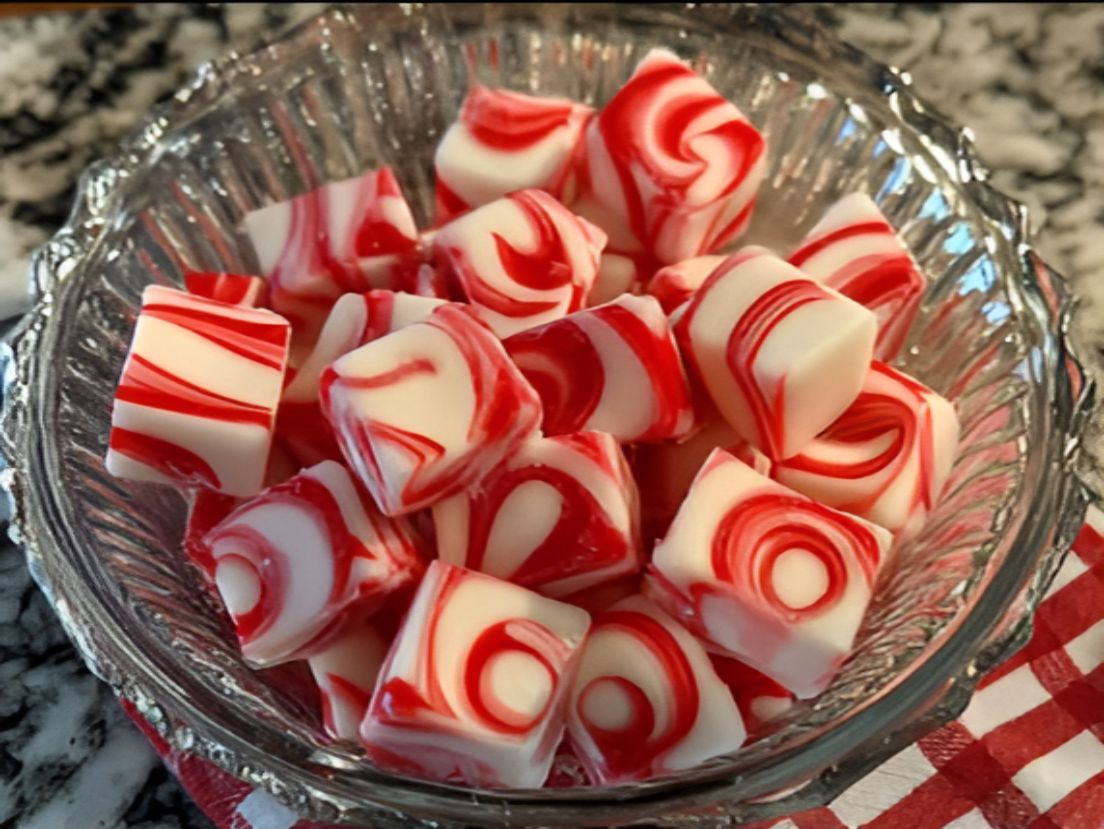
These soft peppermint candies are the real deal – not the hard store-bought kind, but genuine melt-in-your-mouth butter mints just like grandma used to serve. Sweet, minty, creamy perfection that makes every guest smile. The beautiful red and white swirls feel like the holidays in your hands, and they’re wonderful for getting grandchildren involved in the kitchen!
What Makes This Recipe Perfect for the Holidays
This homemade Christmas candy recipe creates tender, creamy mints with that classic peppermint flavor we all love. They’re easy Christmas candies to make and wonderful for:
- Holiday cookie trays and candy dishes
- Homemade gifts for neighbors and friends
- Christmas parties and family gatherings
- Keeping on hand for unexpected guests
- Creating sweet memories with grandchildren
Ingredients for Old-Fashioned Butter Mints
Makes about 100 beautiful mints
- 1/2 cup butter, softened to room temperature
- 4 cups powdered sugar (confectioners’ sugar), plus extra for dusting
- 2 tablespoons heavy whipping cream
- 1/4 teaspoon peppermint extract (you can adjust to your taste)
- Red gel food coloring
Step-by-Step Instructions (Made Easy!)
Preparing Your Workspace
Step 1: Clear a large, clean work surface and cover it with parchment paper or wax paper. This is where your beautiful mints will rest and dry.
Step 2: Have some extra powdered sugar ready in a small bowl for dusting your hands and work surface.
Making the Mint Dough (Simple and Quick!)
Step 3: In a large mixing bowl, beat the softened butter with an electric mixer on medium speed until it’s light and fluffy (about 2 minutes). The butter should look pale and creamy.
Step 4: Add the heavy whipping cream, powdered sugar, and peppermint extract to the bowl.
Step 5: Mix on low speed at first (to avoid a sugar cloud!), then increase to medium speed. Beat until everything comes together into a firm, workable dough. This takes about 2-3 minutes. The dough should be smooth and hold together well – like playdough.
Helpful Hint: Taste a tiny bit! If you’d like more peppermint flavor, add just 2-3 more drops of extract. Remember, a little peppermint goes a long way.
Creating the Pretty Red and White Swirls
Step 6: Divide your dough into two portions – one larger, one smaller. Keep 3/4 of the dough white (the larger portion). Take the smaller 1/4 portion and add 3-4 drops of red gel food coloring.
Step 7: Knead the red portion with your hands until the color is even throughout. Wear disposable gloves if you prefer to keep your hands clean!
Shaping Your Beautiful Butter Mints (This Is the Fun Part!)
Step 8: Dust your work surface lightly with powdered sugar. Take some of your white dough and roll it between your palms into a rope about 10-12 inches long. Make this rope thicker – about the width of your thumb.
Step 9: Take some red dough and roll it into a thinner rope, the same length as your white rope – about as thick as a pencil.
Step 10: Lay the thin red rope right beside the thick white rope on your work surface.
Step 11: Now for the magical part! Gently twist the two ropes together, making that beautiful candy cane pattern. Don’t twist too tightly – keep it gentle.
Step 12: Roll the twisted rope gently between your palms to smooth it out and blend the colors slightly. This creates that classic peppermint swirl look!
Step 13: Carefully lay your beautiful twisted rope on the parchment paper. Make more ropes with the remaining dough.
Drying Your Mints (Patience Makes Perfect!)
Step 14: Let the twisted ropes rest and dry for 1-2 hours. They’ll firm up slightly, which makes cutting much easier.
Step 15: After the ropes have dried for 1-2 hours, use a pizza cutter or sharp knife to cut them into bite-sized pieces – about 1/2 inch thick. Each piece will be a perfect little mint pillow!
Step 16: Leave the cut mints on the parchment paper and let them dry completely for 24 hours at room temperature. This is what gives them that perfect soft, creamy, melt-in-your-mouth texture!
Important Tip: Don’t rush the drying time. That 24-hour rest is the secret to authentic butter mint texture.
Helpful Tips for Perfect Butter Mints Every Time
- Room temperature butter is key: Butter that’s too cold won’t mix smoothly; butter that’s too soft makes the dough sticky
- Gel food coloring works best: It won’t make your dough too wet like liquid food coloring can
- If the dough gets sticky: Pop it in the refrigerator for 10 minutes to firm up
- Make it easier: If rolling ropes is difficult, you can roll small balls and gently flatten them with a fork
- Keep your hands dusted: A light coating of powdered sugar on your hands prevents sticking
- Don’t stack them while drying: Let them dry in a single layer for best results
Storage and Gift-Giving Ideas
Once your homemade peppermint mints are completely dry (after the full 24 hours), store them in an airtight container at room temperature. They’ll stay fresh and delicious for up to 2 weeks. They also freeze beautifully for up to 3 months!
Pretty Ways to Share:
- Pack in small cellophane bags tied with festive ribbon
- Layer in decorative tins with parchment between layers
- Arrange on vintage glass dishes for your holiday table
- Include in homemade cookie gift boxes
- Fill small mason jars and add a gift tag
Recipe Information at a Glance
Prep Time: 30 minutes
Drying Time: 24 hours
Total Time: 24 hours 30 minutes
Yield: About 100 delightful mints
Why This Old-Fashioned Recipe Never Goes Out of Style
There’s something magical about vintage Christmas candy recipes like these soft butter mints. They connect us to simpler times, to beloved grandmothers, and to the true spirit of the season. When you place a dish of these festive holiday mints on your table, you’re not just serving candy – you’re serving memories, tradition, and love.
These easy homemade mints are perfect for including children and grandchildren in your holiday baking. Rolling and twisting the colorful ropes is fun for little hands (and big ones too!), and that swirl of red and white truly feels like the holidays in your hands.
The Perfect Addition to Your Holiday Traditions
Whether you’re continuing a family tradition or starting a new one, these Christmas peppermint butter mints deserve a place on your holiday table. They’re the kind of treat that makes guests reach for “just one more,” and the kind of recipe that gets passed down through generations.
Soft, creamy, peppermint-bright – classic holiday goodness that brings smiles to every face. These are peppermint-bright perfection, the kind of candy that makes every guest smile and keeps them coming back for more.
Make a batch today and fill your home with the sweet, minty magic of an old-fashioned Christmas!