
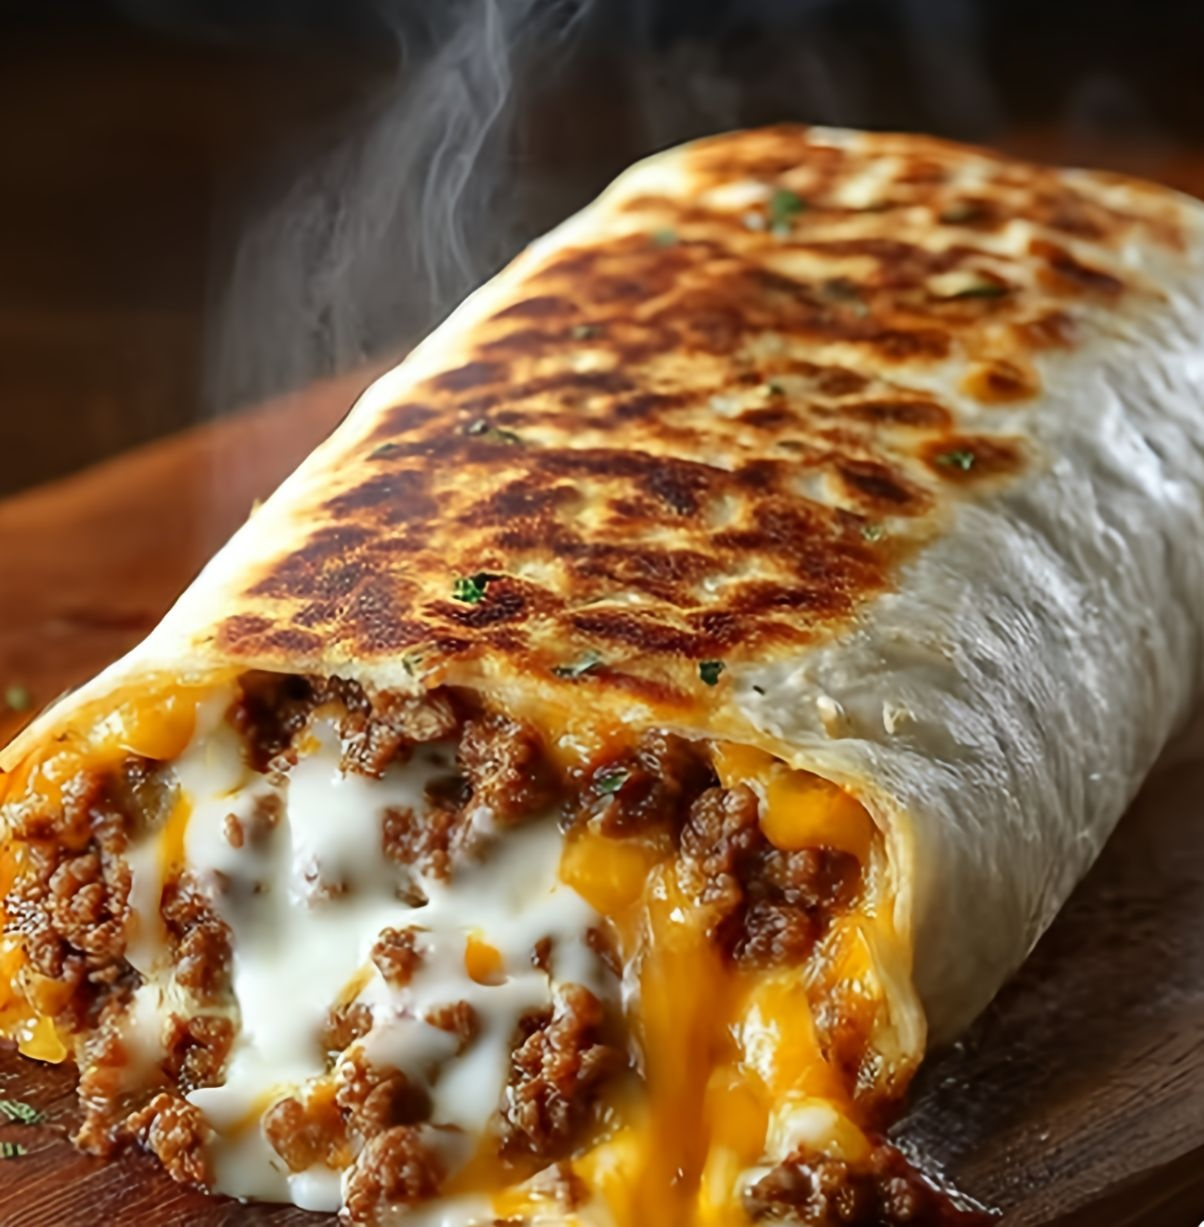
We have today the perfect mashup of two beloved comfort foods – the classic grilled cheese and the hearty burrito! This crispy grilled cheese burrito features melted cheese, your choice of protein, and a golden, buttery exterior that’s absolutely irresistible. Ready in just 15 minutes, it’s perfect for quick lunches, easy dinners, or late-night cravings.
Prep Time: 5 minutes
Cook Time: 10 minutes
Total Time: 15 minutes
Serves: 2 people
Difficulty: Super Easy
What You’ll Need
For 2 Amazing Burritos:
- 2 large flour tortillas
- 1 cup shredded cheddar cheese or Mexican blend cheese
- ½ cup cooked chicken, beef, or beans (optional)
- 2 tbsp butter
- 2 tbsp sour cream or cream cheese (optional)
- Salsa or hot sauce for serving (optional)
How to Make This Crispy, Cheesy Perfection
Step 1: Build Your Burrito Base
Lay out one large flour tortilla on a clean work surface. Sprinkle half of the shredded cheese evenly over the center of the tortilla, leaving about 2 inches around the edges. This cheese layer is crucial – it acts as the “glue” that holds everything together and provides that amazing cheese pull when you bite in.
Step 2: Add Your Delicious Filling
If you’re using cooked protein or beans, add about ¼ cup to the center of the cheese layer. You can use leftover rotisserie chicken, seasoned ground beef, black beans, or even refried beans – whatever you have on hand works great! Add a dollop of sour cream or cream cheese if you want extra creaminess. Top everything with the remaining cheese to lock in the filling.
Step 3: Roll It Up Tight
Fold the left and right sides of the tortilla over the filling, then fold the bottom edge up and roll tightly toward the top, creating a secure burrito. The key is to roll it tightly enough that the filling stays in place but not so tight that it tears. Repeat this process with the second tortilla.
Step 4: Grill to Golden Perfection
Heat a large skillet over medium heat and add 1 tablespoon of butter, letting it melt and coat the pan. Place the first burrito seam-side down in the skillet – this helps seal it closed. Cook for 2-3 minutes without moving it, until the bottom turns golden brown and crispy. Use a spatula to carefully flip the burrito and cook for another 2-3 minutes until the other side is equally golden and the cheese inside is completely melted.
Step 5: Repeat and Serve
Add the remaining tablespoon of butter to the pan and repeat with the second burrito. Once both are perfectly crispy and golden, transfer to a cutting board and let them rest for 1-2 minutes. This brief rest allows the cheese to set slightly, making them easier to cut and eat without all the filling spilling out.
Step 6: Serve Hot and Enjoy
Cut each burrito in half diagonally to show off the melty cheese inside. Serve immediately while hot and crispy with your favorite toppings like salsa, hot sauce, guacamole, or extra sour cream on the side for dipping.
Pro Tips for Perfect Results
Room Temperature Tortillas: Slightly warm tortillas are more pliable and less likely to tear when rolling.
Don’t Overfill: Too much filling makes the burrito hard to roll and more likely to burst open.
Seam-Side Down First: Always place the burrito seam-side down first to seal it closed naturally.
Medium Heat: Keep the heat at medium to ensure the cheese melts before the tortilla burns.
Press Gently: Use a spatula to press down lightly while cooking for maximum crispiness.
What to Serve With Your Grilled Cheese Burrito
These satisfying burritos pair perfectly with:
- Fresh pico de gallo or chunky salsa
- Creamy guacamole or sliced avocado
- Mexican-style rice or cilantro lime rice
- Crispy tortilla chips
- Simple green salad with lime vinaigrette
- Black beans or refried beans on the side
Delicious Variations to Try
Breakfast Version: Fill with scrambled eggs, bacon, and cheese for breakfast Vegetarian Delight: Use black beans, corn, bell peppers, and extra cheese Spicy Southwest: Add jalapeños, pepper jack cheese, and chipotle sauce BBQ Chicken: Use BBQ sauce, chicken, and cheddar for a tangy twist Pizza Style: Fill with mozzarella, pepperoni, and marinara for dipping
Perfect Occasions for This Easy Recipe
These versatile burritos are ideal for:
- Quick Weeknight Dinners: Ready in 15 minutes from start to finish
- Easy Lunches: Great for meal prep and reheating
- Late-Night Snacks: Satisfying comfort food when cravings hit
- College Student Meals: Budget-friendly and simple to make
- Kids’ Favorites: Easy to customize for picky eaters
Storage and Reheating Tips
Make Ahead: Assemble burritos and refrigerate uncooked for up to 4 hours before grilling.
Refrigerator Storage: Store cooked burritos wrapped in foil for up to 2 days.
Reheating: Reheat in a skillet over medium-low heat for 2-3 minutes per side, or in a 350°F oven for 10 minutes.
Freezer Friendly: Wrap cooled burritos individually and freeze for up to 1 month. Thaw before reheating.
Why This Recipe is So Addictive
The magic of the grilled cheese burrito lies in the combination of textures and flavors – the crispy, buttery exterior gives way to a soft tortilla filled with gooey melted cheese and your choice of savory fillings. It’s the best of both worlds: the comfort of a grilled cheese sandwich with the hearty satisfaction of a burrito. Plus, it’s endlessly customizable based on what you have in your fridge!
This crispy grilled cheese burrito is proof that the simplest recipes are often the most satisfying. With just a few basic ingredients and minimal cooking time, you can create a restaurant-worthy meal that’s perfect for any time of day!