

Hello everyone! These delightful ham and cheese puff pastry pockets are about to become your go-to recipe for quick, satisfying meals that look absolutely impressive. Imagine biting into perfectly golden, flaky pastry that gives way to warm, melted cheese and savory ham – it’s comfort food at its finest. Whether you need a quick lunch, elegant appetizer, or satisfying snack, these pockets deliver every single time.
What You’ll Need
Main Ingredients:
- 1 sheet puff pastry (about 250g/8.8oz), thawed completely
- 150g (5 oz) ham, thinly sliced or diced
- 150g (5 oz) cheese (cheddar, mozzarella, or Gruyère), freshly grated
- 1 large egg, beaten for egg wash
Optional Flavor Enhancers:
- 1 tbsp Dijon mustard or mayonnaise (adds wonderful depth)
- Black pepper, to taste
Step-by-Step Instructions
Getting Your Kitchen Ready
Step 1: First things first – preheat your oven to 400°F (200°C). This temperature is perfect for creating that beautiful golden color and flaky texture we’re after. Line a large baking sheet with parchment paper, which will prevent sticking and make cleanup so much easier.
Step 2: Make sure your puff pastry is completely thawed but still cold to the touch. If it’s too warm, it becomes difficult to work with and won’t puff up properly in the oven.
Preparing Your Puff Pastry Canvas
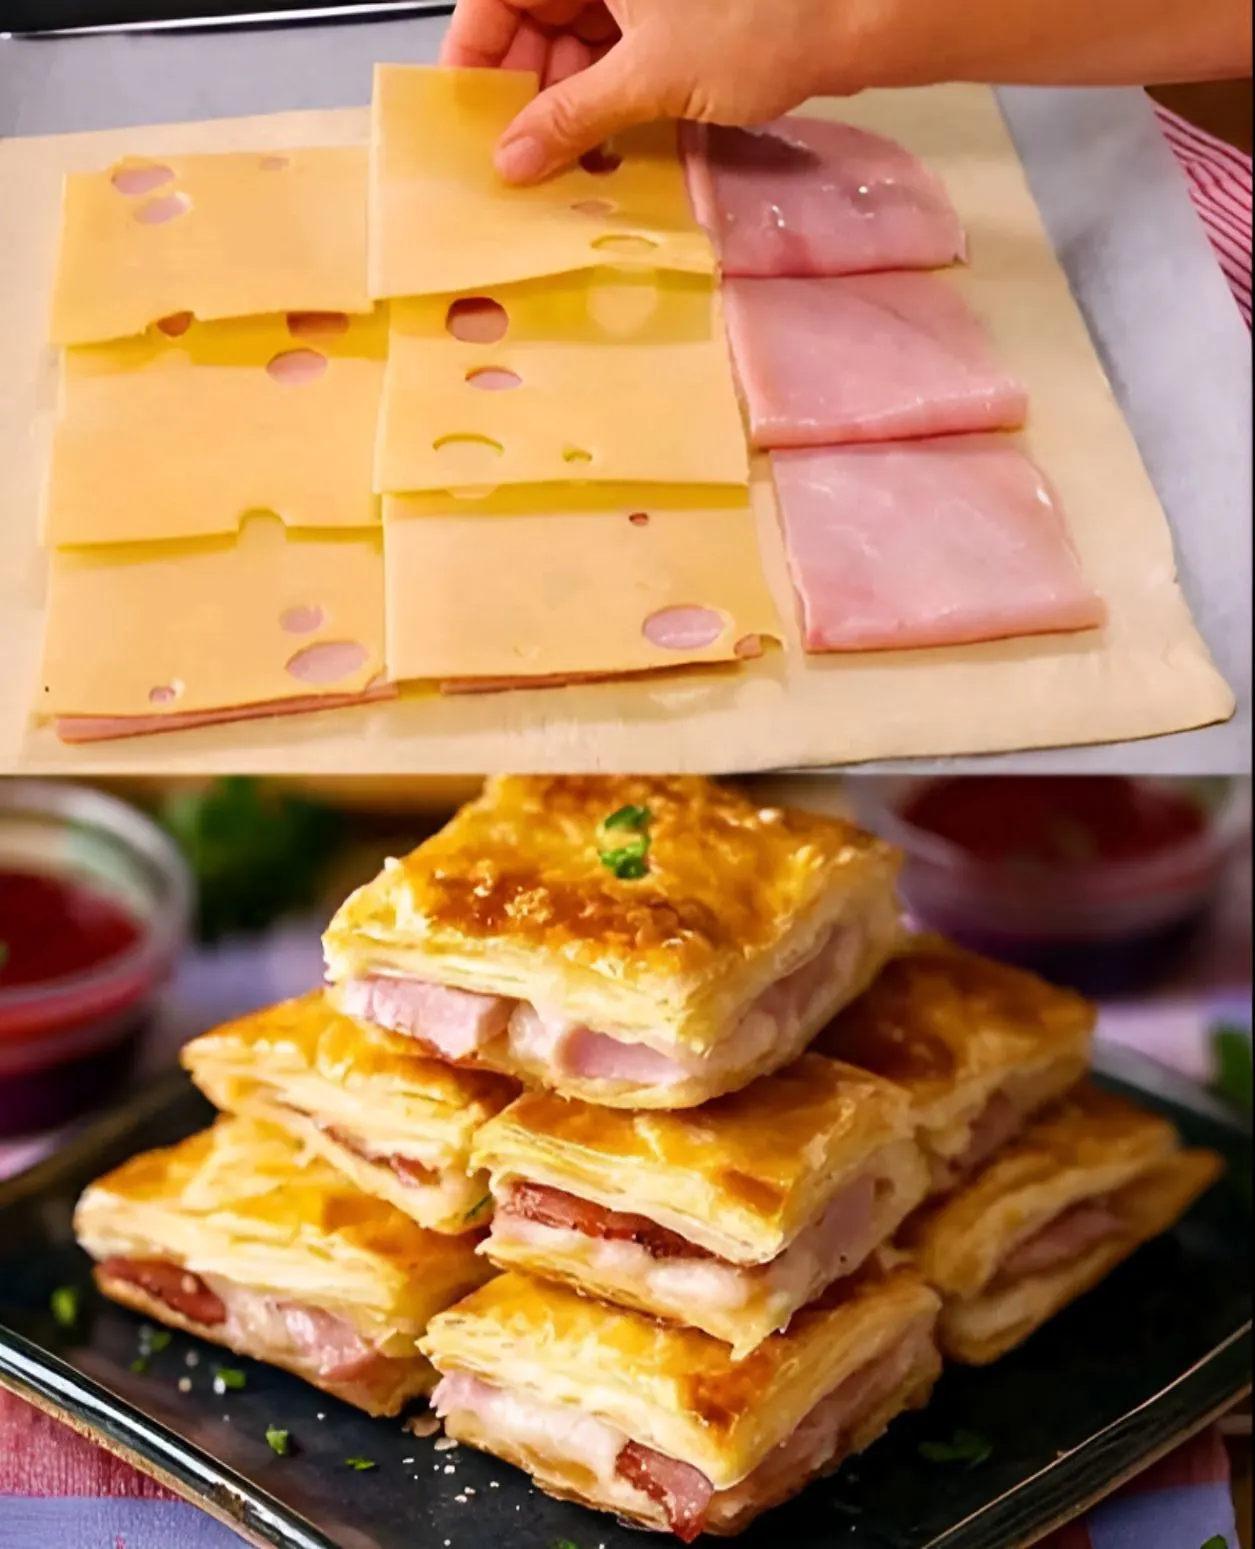
Step 3: On a lightly floured surface, gently roll out your puff pastry sheet. You don’t need to roll it much thinner – just enough to smooth out any fold lines and make it easier to cut. Using a sharp knife or pizza cutter, cut the pastry into 6 equal rectangles. Take your time with this step – even rectangles will help ensure even cooking.
Building Your Delicious Pockets
Step 4: Now for the fun part – creating your pockets! If you’re using Dijon mustard or mayonnaise, spread a very thin layer on one half of each rectangle. This adds a lovely tangy flavor that complements the ham and cheese beautifully, but don’t use too much or it might make the pastry soggy.
Step 5: On the same half where you added the condiment (or on half of each rectangle if you’re skipping the condiment), place a generous portion of your ham. Distribute it evenly, leaving about a 1/2 inch border around the edges for sealing.
Step 6: Sprinkle the grated cheese generously over the ham. The cheese will melt and help bind everything together. Add a light sprinkle of freshly ground black pepper if you like – it adds a lovely little kick.
Creating the Perfect Seal
Step 7: Here’s the crucial step for success – carefully fold the empty half of each pastry rectangle over the filling to create your pocket. Don’t stretch the pastry; just gently bring it over and line up the edges.
Step 8: Using a fork, press firmly around all three open edges to seal the pockets completely. This step is really important – you want to make sure no cheese can escape during baking. Press down well, but not so hard that you tear the pastry.
The Golden Finish
Step 9: Carefully transfer your sealed pockets to your prepared baking sheet, spacing them about 2 inches apart. Using a pastry brush or the back of a spoon, brush the tops of each pocket with the beaten egg. This egg wash is what gives them that gorgeous golden, glossy finish.
Step 10: If you’d like, you can use a sharp knife to make a small slit or two on top of each pocket – this allows steam to escape and prevents them from bursting open.
Baking to Perfection
Step 11: Place your baking sheet in the preheated oven and bake for 18-20 minutes. You’ll know they’re done when the pastry is beautifully golden brown and looks crispy. The smell will be absolutely amazing!
Step 12: Remove from the oven and let them cool on the baking sheet for about 5 minutes before serving. This cooling time allows the cheese to set slightly and prevents burns from molten cheese.
Serving Suggestions
These versatile pockets are wonderful served warm as a main dish alongside a fresh green salad or some roasted vegetables. They’re also perfect as appetizers for parties – just cut each one in half diagonally for elegant presentation. For dipping, try ketchup, honey mustard, or a creamy garlic sauce.
Why This Recipe Works So Well
The beauty of puff pastry is how it creates those incredibly flaky, buttery layers that contrast perfectly with the creamy melted cheese and savory ham. The key is keeping the pastry cold until it goes in the oven, which helps create maximum puffiness and flakiness.
Creative Variations and Tips
Flavor Boost Ideas:
- Add fresh herbs like chopped parsley, chives, or thyme for extra freshness
- Include a pinch of chili flakes or a thin slice of jalapeño for some heat
- Try different cheese combinations – Gruyère with ham is particularly elegant
Success Tips:
- Always ensure your pastry edges are well-sealed to prevent cheese leakage
- Don’t overfill the pockets – less is more for the best results
- If your kitchen is very warm, chill the assembled pockets for 10 minutes before baking
Perfect Timing
Prep Time: 15 minutes
Bake Time: 18-20 minutes
Total Time: 35 minutes
Makes: 6 delicious pockets
Perfect for: Lunch, dinner, appetizers, or snacks
These ham and cheese puff pastry pockets prove that simple ingredients, when prepared with care, can create something truly special. Enjoy every crispy, cheesy, satisfying bite!