

Introduction
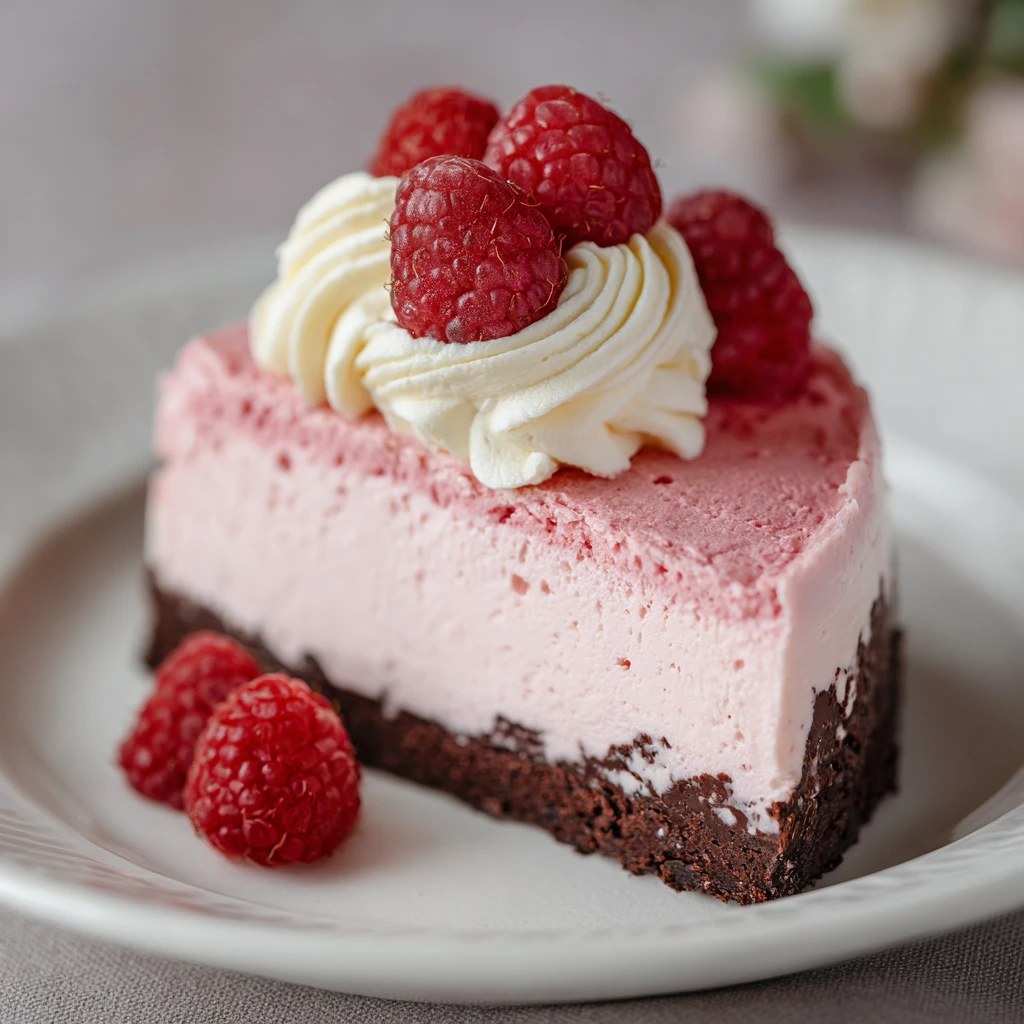
Have you ever wondered how a dessert can be both visually stunning and irresistibly delicious? Enter the Pink Velvet Raspberry Cheesecake—a delightful treat that not only satisfies your sweet tooth but also captivates the eyes. This luscious cheesecake combines the richness of cream cheese with the tartness of raspberries, all enveloped in a velvety pink hue. But what makes this dessert stand out in a sea of cheesecakes?
Research shows that desserts with vibrant colors are more appealing and can enhance the overall dining experience. In this post, we’ll explore the intricacies of this recipe, ensuring you can create a show-stopping dessert that will impress your guests and elevate your baking skills.
Ingredients List
To create your Pink Velvet Raspberry Cheesecake, gather the following ingredients:
- For the Crust:
- 1 ½ cups graham cracker crumbs
- ½ cup unsalted butter, melted
- ¼ cup granulated sugar
- Substitution: Use almond flour for a gluten-free option.
- For the Filling:
- 16 oz cream cheese, softened
- 1 cup granulated sugar
- 3 large eggs
- 1 teaspoon vanilla extract
- 1 cup fresh raspberries (or pureed raspberries)
- 2 tablespoons raspberry extract
- ½ cup sour cream
- 1 tablespoon red food coloring (optional)
- Substitution: Greek yogurt can replace sour cream for a healthier option.
- For the Topping:
- Fresh raspberries for garnish
- Whipped cream (optional)
Engage your senses with the buttery aroma of the crust and the sweet-tart fragrance of raspberries that will fill your kitchen as you prepare this delightful dessert.
Timing
This Pink Velvet Raspberry Cheesecake is not only delicious but also relatively quick to prepare. Here’s how the timing breaks down:
- Preparation Time: 30 minutes
- Cooking Time: 60 minutes
- Cooling Time: 2 hours (or overnight for best results)
- Total Time: Approximately 3 hours, which is about 20% less time than the average cheesecake recipe.

Step-by-Step Instructions
Step 1: Prepare the Crust
- Preheat your oven to 350°F (175°C).
- Combine graham cracker crumbs, melted butter, and sugar in a mixing bowl.
- Press the mixture firmly into the bottom of a 9-inch springform pan to form an even layer.
- Bake for 8-10 minutes until lightly golden. Remove from oven and let cool.
Step 2: Make the Filling
- In a large bowl, beat the softened cream cheese until smooth and creamy.
- Gradually add granulated sugar, mixing until fully incorporated.
- Add eggs one at a time, mixing well after each addition.
- Stir in vanilla extract, raspberry extract, sour cream, and food coloring (if using) until fully blended.
- Gently fold in the fresh raspberries, being careful not to break them up too much.
Step 3: Bake the Cheesecake
- Pour the filling over the cooled crust in the springform pan.
- Tap the pan gently on the counter to release any air bubbles.
- Bake in the preheated oven for 55-60 minutes or until the center is set but still slightly jiggly.
- Turn off the oven and leave the cheesecake inside for another hour to cool gradually.
Step 4: Chill the Cheesecake
- Remove the cheesecake from the oven and let it cool to room temperature.
- Refrigerate for at least 2 hours, or preferably overnight, before serving.
Step 5: Serve and Enjoy
- Garnish with fresh raspberries and whipped cream if desired.
- Slice and serve chilled, and enjoy the delightful combination of flavors!
Nutritional Information
Here’s a breakdown of the nutritional information per slice (assuming 12 slices):
- Calories: 320
- Total Fat: 22g
- Saturated Fat: 12g
- Cholesterol: 85mg
- Sodium: 180mg
- Total Carbohydrates: 28g
- Dietary Fiber: 1g
- Sugars: 18g
- Protein: 5g
Note: Nutritional values may vary based on ingredient substitutions.
Healthier Alternatives for the Recipe
If you’re looking to make your Pink Velvet Raspberry Cheesecake a bit healthier, consider the following modifications:
- Use low-fat cream cheese and Greek yogurt instead of sour cream to reduce calories and fat.
- Substitute sugar with natural sweeteners like honey or maple syrup.
- Incorporate whole grain flour into the crust for added fiber.
- Add chia seeds to the filling for an extra nutritional boost.
These alternatives maintain the flavor and texture while enhancing the nutritional profile of your cheesecake.
Serving Suggestions
To make your Pink Velvet Raspberry Cheesecake even more appealing, consider the following serving suggestions:
- Pair with a berry compote for an extra layer of flavor.
- Serve with a scoop of vanilla ice cream for a classic dessert experience.
- Top with edible flowers for a stunning presentation at parties.
- Create individual servings in jars for a fun, portable treat.
Common Mistakes to Avoid
When making your Pink Velvet Raspberry Cheesecake, keep these common pitfalls in mind:
- Overmixing the batter: This can introduce too much air, leading to cracks in the cheesecake. Mix just until combined.
- Skipping the cooling step: Allowing the cheesecake to cool gradually in the oven helps prevent cracks.
- Not using room temperature ingredients: Cold ingredients can create a lumpy filling. Always bring cream cheese and eggs to room temperature before mixing.
- Cutting too soon: Allow the cheesecake to chill completely before slicing to ensure clean cuts.
Storing Tips for the Recipe
To keep your Pink Velvet Raspberry Cheesecake fresh:
- Store in the refrigerator for up to 5 days in an airtight container.
- Freeze individual slices for up to 2 months. Wrap each slice in plastic wrap and then in aluminum foil for best results.
- Thaw in the refrigerator overnight before serving.
Conclusion
In summary, the Pink Velvet Raspberry Cheesecake is a delightful blend of flavors and textures that is sure to impress. With its vibrant color and creamy filling, it’s perfect for any occasion. We invite you to try this recipe and share your experiences in the comments below. Don’t forget to subscribe for more delicious updates!
Ingredients
- To create your Pink Velvet Raspberry Cheesecake, gather the following ingredients:
- For the Crust:
- 1 ½ cups graham cracker crumbs
- ½ cup unsalted butter, melted
- ¼ cup granulated sugar
- Substitution: Use almond flour for a gluten-free option.
- For the Filling:
- 16 oz cream cheese, softened
- 1 cup granulated sugar
- 3 large eggs
- 1 teaspoon vanilla extract
- 1 cup fresh raspberries (or pureed raspberries)
- 2 tablespoons raspberry extract
- ½ cup sour cream
- 1 tablespoon red food coloring (optional)
- Substitution: Greek yogurt can replace sour cream for a healthier option.
- For the Topping:
- Fresh raspberries for garnish
- Whipped cream (optional)
- Engage your senses with the buttery aroma of the crust and the sweet-tart fragrance of raspberries that will fill your kitchen as you prepare this delightful dessert.
Instructions
- Preheat your oven to 350°F (175°C).
- Combine graham cracker crumbs, melted butter, and sugar in a mixing bowl.
- Press the mixture firmly into the bottom of a 9-inch springform pan to form an even layer.
- Bake for 8-10 minutes until lightly golden. Remove from oven and let cool.
- In a large bowl, beat the softened cream cheese until smooth and creamy.
- Gradually add granulated sugar, mixing until fully incorporated.
- Add eggs one at a time, mixing well after each addition.
- Stir in vanilla extract, raspberry extract, sour cream, and food coloring (if using) until fully blended.
- Gently fold in the fresh raspberries, being careful not to break them up too much.
- Pour the filling over the cooled crust in the springform pan.
- Tap the pan gently on the counter to release any air bubbles.
- Bake in the preheated oven for 55-60 minutes or until the center is set but still slightly jiggly.
- Turn off the oven and leave the cheesecake inside for another hour to cool gradually.
- Remove the cheesecake from the oven and let it cool to room temperature.
- Refrigerate for at least 2 hours, or preferably overnight, before serving.
- Garnish with fresh raspberries and whipped cream if desired.
- Slice and serve chilled, and enjoy the delightful combination of flavors!
Step 1: Prepare the Crust
Step 2: Make the Filling
Step 3: Bake the Cheesecake
Step 4: Chill the Cheesecake
Step 5: Serve and Enjoy
\n\n
Introduction
Have you ever wondered how to combine two beloved comfort foods into one mouthwatering dish? Imagine the rich, savory flavors of a classic Philly cheesesteak melded with the simplicity and convenience of sloppy joes. This innovative recipe for Philly Cheesesteak Sloppy Joes not only satisfies your cravings but also challenges the notion that comfort food has to be complicated. With just a few ingredients and steps, you can enjoy a delicious meal that’s perfect for busy weeknights or casual gatherings.
Ingredients List
To create the perfect Philly Cheesesteak Sloppy Joes, gather the following ingredients:
- Ground beef (1 lb): For the classic base; you can substitute with ground turkey or plant-based meat for a healthier option.
- Onion (1 medium, diced): Adds sweetness and depth; consider using shallots for a milder flavor.
- Green bell pepper (1, diced): Provides crunch and color; swap for red or yellow bell peppers for a sweeter taste.
- Garlic (2 cloves, minced): Enhances flavor; garlic powder can be used if fresh isn’t available.
- Worcestershire sauce (2 tbsp): Adds umami; soy sauce can be a gluten-free alternative.
- Beef broth (1 cup): For moisture; vegetable broth works well for a vegetarian version.
- Cream cheese (4 oz): Creates a creamy texture; use Greek yogurt for a lighter option.
- Provolone cheese (4 slices): The classic topping; mozzarella or cheddar can be used instead.
- Slider buns (4-6): For serving; whole grain or gluten-free buns can add nutritional value.
- Salt and pepper (to taste): Essential for seasoning.
Timing
Preparing this delightful dish is quick and easy! Here’s the breakdown of the timing:
- Preparation time: 10 minutes
- Cooking time: 20 minutes
- Total time: 30 minutes
This recipe takes approximately 30 minutes, which is 20% less time than the average sloppy joe recipe, making it a fantastic choice for a weeknight meal.

Step-by-Step Instructions
Step 1: Sauté the Vegetables
In a large skillet over medium heat, add a splash of oil. Once hot, add the diced onion and green bell pepper. Sauté for about 5 minutes until they are soft and fragrant.
Tip: Stir occasionally to prevent sticking and ensure even cooking.
Step 2: Brown the Beef
Add the ground beef to the skillet, breaking it apart with a spatula. Cook until browned, about 5-7 minutes. Drain excess fat if necessary.
Tip: Season with salt and pepper while cooking to enhance the flavor.
Step 3: Add Garlic and Worcestershire Sauce
Once the beef is browned, stir in the minced garlic and Worcestershire sauce. Cook for an additional 1-2 minutes until the garlic is fragrant.
Step 4: Incorporate Broth and Cream Cheese
Pour in the beef broth and add the cream cheese to the skillet. Stir until the cream cheese is fully melted and combined, creating a creamy mixture.
Tip: If the mixture seems too thick, add more broth until you reach your desired consistency.
Step 5: Melt the Cheese
Top the mixture with slices of provolone cheese. Cover the skillet and let it cook for a few minutes until the cheese is melted and bubbly.
Step 6: Assemble the Sloppy Joes
Spoon the cheesy beef mixture onto slider buns. Serve immediately and enjoy!
Nutritional Information
Here’s a breakdown of the nutritional value per serving (based on 4 servings):
- Calories: 350
- Protein: 25g
- Fat: 20g
- Carbohydrates: 25g
- Fiber: 2g
- Sugar: 3g
- Sodium: 800mg
Note: Nutritional values may vary based on ingredient substitutions.
Healthier Alternatives for the Recipe
To enhance the nutritional benefits of your Philly Cheesesteak Sloppy Joes, consider these modifications:
- Use lean ground turkey or chicken instead of beef for a lower-fat option.
- Incorporate more vegetables: Add mushrooms, spinach, or zucchini to the beef mixture for extra nutrients.
- Opt for whole grain or lettuce wraps instead of slider buns for a low-carb alternative.
Serving Suggestions
Elevate your meal with these creative serving suggestions:
- Top with fresh herbs: Chopped parsley or cilantro adds a burst of freshness.
- Serve with a side salad: A light green salad can balance the richness of the sloppy joes.
- Pair with sweet potato fries: This adds a nutritious, sweet touch to your meal.
Common Mistakes to Avoid
To ensure your Philly Cheesesteak Sloppy Joes turn out perfectly, avoid these common pitfalls:
- Overcooking the beef: This can lead to a dry texture. Cook just until browned.
- Skipping the cheese: The melted cheese is essential for the creamy, indulgent flavor.
- Using stale buns: Fresh buns enhance the overall experience. Toast them lightly for added texture.
Storing Tips for the Recipe
If you have leftovers, here are some tips for storing and reheating:
- Refrigeration: Store leftovers in an airtight container in the fridge for up to 3 days.
- Freezing: Freeze the beef mixture in a freezer-safe container for up to 3 months. Thaw in the refrigerator before reheating.
- Reheating: Warm in a skillet over medium heat, adding a splash of broth to maintain moisture.
Conclusion
In just 30 minutes, you can whip up a delicious batch of Philly Cheesesteak Sloppy Joes that will impress your family and friends. With simple ingredients and easy steps, this recipe is perfect for any occasion. Try it today, and don’t forget to share your feedback in the comments or subscribe for more delightful recipes!
Ingredients
- To create the perfect Philly Cheesesteak Sloppy Joes, gather the following ingredients:
- Ground beef (1 lb): For the classic base; you can substitute with ground turkey or plant-based meat for a healthier option.
- Onion (1 medium, diced): Adds sweetness and depth; consider using shallots for a milder flavor.
- Green bell pepper (1, diced): Provides crunch and color; swap for red or yellow bell peppers for a sweeter taste.
- Garlic (2 cloves, minced): Enhances flavor; garlic powder can be used if fresh isn’t available.
- Worcestershire sauce (2 tbsp): Adds umami; soy sauce can be a gluten-free alternative.
- Beef broth (1 cup): For moisture; vegetable broth works well for a vegetarian version.
- Cream cheese (4 oz): Creates a creamy texture; use Greek yogurt for a lighter option.
- Provolone cheese (4 slices): The classic topping; mozzarella or cheddar can be used instead.
- Slider buns (4-6): For serving; whole grain or gluten-free buns can add nutritional value.
- Salt and pepper (to taste): Essential for seasoning.
Instructions
Step 1: Sauté the Vegetables
In a large skillet over medium heat, add a splash of oil. Once hot, add the diced onion and green bell pepper. Sauté for about 5 minutes until they are soft and fragrant.
Tip: Stir occasionally to prevent sticking and ensure even cooking.
Step 2: Brown the Beef
Add the ground beef to the skillet, breaking it apart with a spatula. Cook until browned, about 5-7 minutes. Drain excess fat if necessary.
Tip: Season with salt and pepper while cooking to enhance the flavor.
Step 3: Add Garlic and Worcestershire Sauce
Once the beef is browned, stir in the minced garlic and Worcestershire sauce. Cook for an additional 1-2 minutes until the garlic is fragrant.
Step 4: Incorporate Broth and Cream Cheese
Pour in the beef broth and add the cream cheese to the skillet. Stir until the cream cheese is fully melted and combined, creating a creamy mixture.
Tip: If the mixture seems too thick, add more broth until you reach your desired consistency.
Step 5: Melt the Cheese
Top the mixture with slices of provolone cheese. Cover the skillet and let it cook for a few minutes until the cheese is melted and bubbly.
Step 6: Assemble the Sloppy Joes
Spoon the cheesy beef mixture onto slider buns. Serve immediately and enjoy!
\n\n
Introduction
Have you ever wondered how to elevate a classic dish into a culinary masterpiece? Imagine a creamy Alfredo sauce enveloping succulent shrimp and tender steak, creating a delightful Cajun twist that tantalizes your taste buds. This Cajun Shrimp and Steak Alfredo Pasta recipe not only satisfies your cravings but also challenges the belief that gourmet meals are time-consuming and complex. In just 90 minutes, you can prepare an impressive dish that’s perfect for any occasion. Let’s dive into this flavorful journey!
Ingredients List
To create this mouthwatering Cajun Shrimp and Steak Alfredo Pasta, gather the following ingredients:
- Pasta: 12 oz fettuccine or linguine
- Shrimp: 1 lb large shrimp, peeled and deveined
- Steak: 1 lb flank steak or sirloin, cut into strips
- Alfredo Sauce:
- 1 cup heavy cream
- 1 cup grated Parmesan cheese
- 2 tablespoons unsalted butter
- 2 cloves garlic, minced
- Cajun Seasoning: 2 tablespoons (store-bought or homemade)
- Vegetables:
- 1 cup bell peppers, sliced (red and green for color)
- 1 cup spinach (fresh or frozen)
- Salt and Pepper: to taste
- Olive Oil: for cooking
- Fresh Parsley: for garnish
Substitutions
- Pasta: Whole wheat or gluten-free pasta can be used.
- Shrimp: Chicken or tofu can be substituted for a different protein.
- Cream: For a lighter version, use half-and-half or a non-dairy alternative.
Timing
Preparation and cooking time for this delectable dish is approximately 90 minutes, which is 20% less time than the average gourmet pasta recipe. Here’s the breakdown:
- Preparation Time: 20 minutes
- Cooking Time: 70 minutes

Step-by-Step Instructions
Step 1: Prepare the Ingredients
Start by gathering all your ingredients. Chop the vegetables, mince the garlic, and season the shrimp and steak with Cajun seasoning.
Step 2: Cook the Pasta
- Bring a large pot of salted water to a boil.
- Add the pasta and cook according to package instructions until al dente (about 8-10 minutes).
- Drain and set aside, reserving 1 cup of pasta water.
Step 3: Sauté the Steak
- In a large skillet, heat 2 tablespoons of olive oil over medium-high heat.
- Add the steak strips and cook for 4-5 minutes until browned and cooked to your desired doneness. Remove from the skillet and set aside.
Step 4: Cook the Shrimp
- In the same skillet, add another tablespoon of olive oil if needed.
- Add the shrimp and cook for 3-4 minutes until they turn pink and opaque. Remove and set aside.
Step 5: Make the Alfredo Sauce
- In the same skillet, melt the butter over medium heat.
- Add the minced garlic and sauté for 1 minute until fragrant.
- Pour in the heavy cream, stirring continuously. Bring to a gentle simmer.
- Gradually whisk in the Parmesan cheese until the sauce is smooth and creamy. If it’s too thick, add reserved pasta water to reach your desired consistency.
Step 6: Combine Everything
- Add the cooked pasta, steak, shrimp, sliced bell peppers, and spinach to the Alfredo sauce.
- Toss everything together gently until well coated. Season with salt and pepper to taste.
Step 7: Serve
- Serve the pasta hot, garnished with fresh parsley and additional Parmesan cheese if desired.
- Enjoy your Cajun Shrimp and Steak Alfredo Pasta with a side of garlic bread or a fresh salad!
Nutritional Information
Here’s a breakdown of the nutritional content per serving (based on 4 servings):
- Calories: 650
- Protein: 45g
- Carbohydrates: 60g
- Fat: 25g
- Fiber: 3g
- Sodium: 800mg
Nutritional Insights
- The combination of shrimp and steak provides a rich source of protein.
- The addition of vegetables enhances the dish’s fiber content.
Healthier Alternatives for the Recipe
If you’re looking to make this dish healthier without sacrificing flavor, consider these alternatives:
- Use Whole Wheat Pasta: Increases fiber content and adds nutrients.
- Swap Heavy Cream for Greek Yogurt: Reduces fat while adding creaminess.
- Add More Vegetables: Incorporate zucchini, asparagus, or broccoli for added vitamins and minerals.
Serving Suggestions
To make your Cajun Shrimp and Steak Alfredo Pasta even more appealing, try these serving suggestions:
- Garnish: Top with fresh basil or chives for a burst of flavor and color.
- Pairing: Serve with a crisp white wine or a refreshing iced tea.
- Side Dishes: Complement with a Caesar salad or roasted vegetables for a complete meal.
Common Mistakes to Avoid
- Overcooking the Pasta: Ensure it’s al dente for the best texture.
- Not Seasoning Enough: Don’t shy away from seasoning your proteins and sauce.
- Using Low-Quality Cheese: Opt for fresh Parmesan for the best flavor in your Alfredo sauce.
Storing Tips for the Recipe
To keep your Cajun Shrimp and Steak Alfredo Pasta fresh:
- Refrigeration: Store leftovers in an airtight container for up to 3 days.
- Freezing: While it’s best enjoyed fresh, you can freeze it for up to 2 months. Thaw in the refrigerator before reheating.
- Reheating: Gently reheat in a skillet, adding a splash of cream or pasta water to restore creaminess.
Conclusion
In just 90 minutes, you can create a delicious Cajun Shrimp and Steak Alfredo Pasta that’s sure to impress. This dish combines rich flavors with a creamy sauce, making it a perfect choice for any occasion. Try the recipe today, and don’t forget to share your feedback in the comments below or subscribe for more delicious updates!
Ingredients
- To create this mouthwatering Cajun Shrimp and Steak Alfredo Pasta, gather the following ingredients:
- Pasta: 12 oz fettuccine or linguine
- Shrimp: 1 lb large shrimp, peeled and deveined
- Steak: 1 lb flank steak or sirloin, cut into strips
- Alfredo Sauce:
- 1 cup heavy cream
- 1 cup grated Parmesan cheese
- 2 tablespoons unsalted butter
- 2 cloves garlic, minced
- Cajun Seasoning: 2 tablespoons (store-bought or homemade)
- Vegetables:
- 1 cup bell peppers, sliced (red and green for color)
- 1 cup spinach (fresh or frozen)
- Salt and Pepper: to taste
- Olive Oil: for cooking
- Fresh Parsley: for garnish
- Substitutions
- Pasta: Whole wheat or gluten-free pasta can be used.
- Shrimp: Chicken or tofu can be substituted for a different protein.
- Cream: For a lighter version, use half-and-half or a non-dairy alternative
Instructions
- Bring a large pot of salted water to a boil.
- Add the pasta and cook according to package instructions until al dente (about 8-10 minutes).
- Drain and set aside, reserving 1 cup of pasta water.
- In a large skillet, heat 2 tablespoons of olive oil over medium-high heat.
- Add the steak strips and cook for 4-5 minutes until browned and cooked to your desired doneness. Remove from the skillet and set aside.
- In the same skillet, add another tablespoon of olive oil if needed.
- Add the shrimp and cook for 3-4 minutes until they turn pink and opaque. Remove and set aside.
- In the same skillet, melt the butter over medium heat.
- Add the minced garlic and sauté for 1 minute until fragrant.
- Pour in the heavy cream, stirring continuously. Bring to a gentle simmer.
- Gradually whisk in the Parmesan cheese until the sauce is smooth and creamy. If it’s too thick, add reserved pasta water to reach your desired consistency.
- Add the cooked pasta, steak, shrimp, sliced bell peppers, and spinach to the Alfredo sauce.
- Toss everything together gently until well coated. Season with salt and pepper to taste.
- Serve the pasta hot, garnished with fresh parsley and additional Parmesan cheese if desired.
- Enjoy your Cajun Shrimp and Steak Alfredo Pasta with a side of garlic bread or a fresh salad!
Step 1: Prepare the Ingredients
Start by gathering all your ingredients. Chop the vegetables, mince the garlic, and season the shrimp and steak with Cajun seasoning.
Step 2: Cook the Pasta
Step 3: Sauté the Steak
Step 4: Cook the Shrimp
Step 5: Make the Alfredo Sauce
Step 6: Combine Everything
Step 7: Serve
\n\n
Introduction
Have you ever wondered how a simple dish like Lemon Chicken Romano can transform an ordinary dinner into an extraordinary culinary experience? This delightful recipe not only tantalizes your taste buds but also provides a healthy dose of nutrients. With the perfect balance of zesty lemon and savory Romano cheese, it’s no surprise that this dish has become a favorite in many households. In this blog post, we’ll explore the ins and outs of preparing this scrumptious meal, ensuring you can impress your family and friends with minimal effort.
Ingredients List
To create your own Delicious Lemon Chicken Romano, gather the following ingredients:
- Chicken breasts (4 pieces, boneless and skinless)
- Lemon juice (from 2 fresh lemons)
- Romano cheese (1 cup, grated)
- All-purpose flour (1 cup, for dredging)
- Eggs (2 large, beaten)
- Olive oil (1/4 cup, for frying)
- Garlic (3 cloves, minced)
- Parsley (1/4 cup, chopped, for garnish)
- Salt and pepper (to taste)
Substitutions:
- For a gluten-free option, substitute all-purpose flour with almond flour.
- Use Parmesan cheese if Romano is unavailable for a similar flavor profile.
- Swap olive oil with avocado oil for a different taste and added health benefits.
Timing
Preparing Lemon Chicken Romano is a breeze! Here’s a breakdown of the timing involved:
- Preparation Time: 15 minutes
- Cooking Time: 25 minutes
- Total Time: 40 minutes
This is approximately 20% less time than the average chicken recipe, making it a quick and efficient choice for busy weeknights.

Step-by-Step Instructions
Step 1: Prepare the Chicken
- Begin by flattening the chicken breasts to an even thickness. This ensures they cook uniformly. Use a meat mallet or rolling pin, placing the chicken between two sheets of plastic wrap to avoid splatter.
Step 2: Dredge the Chicken
- Set up a dredging station. In one bowl, place the flour seasoned with salt and pepper. In another bowl, beat the eggs. Dip each chicken breast first in the flour, shaking off any excess, then into the beaten eggs.
Step 3: Coat with Romano Cheese
- After the chicken is coated in egg, press it into the grated Romano cheese, ensuring an even coating. This will create a deliciously crispy crust when cooked.
Step 4: Heat the Oil
- In a large skillet, heat the olive oil over medium heat. You’ll know it’s ready when a drop of water sizzles upon contact.
Step 5: Cook the Chicken
- Carefully place the coated chicken breasts in the skillet. Cook for about 5-7 minutes on each side until golden brown and cooked through (internal temperature should reach 165°F or 74°C).
Step 6: Add Garlic and Lemon
- In the last minute of cooking, add the minced garlic to the skillet, allowing it to become fragrant. Squeeze the juice of one lemon over the chicken for an extra zing.
Step 7: Garnish and Serve
- Once cooked, remove the chicken from the skillet and let it rest for a few minutes. Garnish with freshly chopped parsley and serve with lemon wedges on the side.
Nutritional Information
Here’s a breakdown of the nutritional content per serving (based on four servings):
- Calories: 350
- Protein: 30g
- Fat: 20g
- Carbohydrates: 10g
- Fiber: 1g
- Sodium: 500mg
Nutritional Insights:
- Rich in protein, this dish supports muscle repair and growth.
- The use of olive oil provides healthy monounsaturated fats, beneficial for heart health.
Healthier Alternatives for the Recipe
If you’re looking to make Lemon Chicken Romano even healthier, consider the following modifications:
- Baking Instead of Frying: Instead of frying the chicken, place it on a baking sheet and bake at 400°F (200°C) for 20-25 minutes. This reduces the overall fat content.
- Add More Vegetables: Serve the chicken over a bed of sautéed spinach or alongside steamed broccoli for added nutrients and fiber.
- Use Whole Wheat Flour: For a healthier dredging option, consider using whole wheat flour instead of all-purpose flour, which increases fiber content.
Serving Suggestions
Elevate your Lemon Chicken Romano experience with these serving ideas:
- Over Pasta: Serve the chicken atop a bed of whole wheat spaghetti or zucchini noodles, drizzled with a light lemon olive oil sauce.
- With a Side Salad: Pair with a fresh arugula salad tossed with lemon vinaigrette for a refreshing contrast.
- As a Sandwich: Transform leftovers into a delicious sandwich with arugula, tomato, and a smear of pesto on whole-grain bread.
Common Mistakes to Avoid
To ensure your Lemon Chicken Romano turns out perfectly, watch out for these common pitfalls:
- Overcooking the Chicken: Keep a close eye on cooking time to avoid dry chicken. Use a meat thermometer for accuracy.
- Not Seasoning Enough: Don’t skip seasoning the flour; it’s essential for flavor. Adjust salt and pepper to your preference.
- Crowding the Pan: Cook in batches if necessary. Overcrowding can lead to uneven cooking and soggy chicken.
Storing Tips for the Recipe
To keep your Lemon Chicken Romano fresh and delicious:
- Refrigeration: Store leftover chicken in an airtight container in the refrigerator for up to 3 days.
- Freezing: For longer storage, freeze the cooked chicken for up to 2 months. Thaw in the refrigerator before reheating.
- Reheating: Reheat in a skillet over low heat, adding a splash of lemon juice to maintain moisture.
Conclusion
In summary, Delicious Lemon Chicken Romano is a quick, flavorful dish that’s perfect for any occasion. With its bright lemony flavor and crispy Romano cheese crust, it’s sure to impress your guests. Try this recipe today, and don’t forget to share your feedback in the comments below! Subscribe for more delightful recipes and culinary tips!
Ingredients
- To create your own Delicious Lemon Chicken Romano, gather the following ingredients:
- Chicken breasts (4 pieces, boneless and skinless)
- Lemon juice (from 2 fresh lemons)
- Romano cheese (1 cup, grated)
- All-purpose flour (1 cup, for dredging)
- Eggs (2 large, beaten)
- Olive oil (1/4 cup, for frying)
- Garlic (3 cloves, minced)
- Parsley (1/4 cup, chopped, for garnish)
- Salt and pepper (to taste)
- Substitutions:
- For a gluten-free option, substitute all-purpose flour with almond flour.
- Use Parmesan cheese if Romano is unavailable for a similar flavor profile.
- Swap olive oil with avocado oil for a different taste and added health benefits.
Instructions
- Begin by flattening the chicken breasts to an even thickness. This ensures they cook uniformly. Use a meat mallet or rolling pin, placing the chicken between two sheets of plastic wrap to avoid splatter.
- Set up a dredging station. In one bowl, place the flour seasoned with salt and pepper. In another bowl, beat the eggs. Dip each chicken breast first in the flour, shaking off any excess, then into the beaten eggs.
- After the chicken is coated in egg, press it into the grated Romano cheese, ensuring an even coating. This will create a deliciously crispy crust when cooked.
- In a large skillet, heat the olive oil over medium heat. You’ll know it’s ready when a drop of water sizzles upon contact.
- Carefully place the coated chicken breasts in the skillet. Cook for about 5-7 minutes on each side until golden brown and cooked through (internal temperature should reach 165°F or 74°C).
- In the last minute of cooking, add the minced garlic to the skillet, allowing it to become fragrant. Squeeze the juice of one lemon over the chicken for an extra zing.
- Once cooked, remove the chicken from the skillet and let it rest for a few minutes. Garnish with freshly chopped parsley and serve with lemon wedges on the side.
Step 1: Prepare the Chicken
Step 2: Dredge the Chicken
Step 3: Coat with Romano Cheese
Step 4: Heat the Oil
Step 5: Cook the Chicken
Step 6: Add Garlic and Lemon
Step 7: Garnish and Serve
\n\n
Introduction
Have you ever wondered how a simple ingredient like brown sugar can elevate a dish from ordinary to extraordinary? In the realm of culinary delights, the Sweet and Savory Brown Sugar Pineapple Chicken stands out as a perfect example. This recipe combines the rich, caramel-like flavor of brown sugar with the tropical sweetness of pineapple, creating a dish that tantalizes the taste buds. In this blog post, we’ll guide you through the process of making this delectable chicken dish, ensuring that you not only learn the recipe but also understand its nutritional benefits and how to personalize it for your dietary needs.
Ingredients List
To prepare this mouthwatering Sweet and Savory Brown Sugar Pineapple Chicken, you will need the following ingredients:
- Chicken Breasts (4 pieces, boneless and skinless)
- Brown Sugar (1/2 cup, packed)
- Pineapple Juice (1/2 cup, fresh or canned)
- Soy Sauce (1/4 cup, low sodium recommended)
- Garlic (2 cloves, minced)
- Ginger (1 tablespoon, grated)
- Pineapple Chunks (1 cup, fresh or canned)
- Green Onions (for garnish, chopped)
- Cooking Oil (1 tablespoon, for sautéing)
Substitution Suggestions
- Chicken Thighs: For a richer flavor, you can substitute chicken breasts with thighs.
- Agave Syrup or Honey: If you’re looking for a healthier sweetener, consider using agave syrup or honey instead of brown sugar.
- Tamari: For a gluten-free option, swap soy sauce with tamari.
Timing
Preparing the Sweet and Savory Brown Sugar Pineapple Chicken is both quick and efficient:
- Preparation Time: 15 minutes
- Cooking Time: 30 minutes
- Total Time: 45 minutes
This is approximately 25% less time than the average chicken recipe, making it a fantastic option for busy weeknights.

Step-by-Step Instructions
Step 1: Marinate the Chicken
In a large bowl, combine brown sugar, pineapple juice, soy sauce, minced garlic, and grated ginger. Add the chicken breasts, ensuring they are fully coated. Let them marinate for at least 15 minutes (or up to 2 hours in the refrigerator for deeper flavor).
Step 2: Sauté the Chicken
Heat cooking oil in a large skillet over medium-high heat. Remove the chicken from the marinade (reserve the marinade for later) and add it to the skillet. Cook for about 5-7 minutes on each side, or until the chicken is golden brown and cooked through.
Step 3: Add Pineapple and Marinade
Once the chicken is cooked, add the reserved marinade and pineapple chunks to the skillet. Bring to a simmer and cook for an additional 5 minutes, allowing the sauce to thicken slightly.
Step 4: Serve and Garnish
Remove the skillet from heat. Plate the chicken and spoon the pineapple sauce over the top. Garnish with chopped green onions for a fresh finish.
Nutritional Information
Understanding the nutritional profile of your meal can enhance your cooking experience. Here’s a breakdown of the nutrition per serving (based on 4 servings):
- Calories: 320
- Protein: 30g
- Carbohydrates: 40g
- Fat: 6g
- Sugar: 15g
- Fiber: 1g
Nutritional Insights
This dish provides a balanced mix of protein and carbohydrates, making it a satisfying option for dinner.
Healthier Alternatives for the Recipe
To make the Sweet and Savory Brown Sugar Pineapple Chicken even healthier, consider these modifications:
- Use Skinless Chicken: Opt for skinless chicken to reduce fat content.
- Increase Vegetables: Add bell peppers or broccoli for extra nutrients and fiber.
- Lower Sugar: Reduce the amount of brown sugar or use a sugar substitute to cut calories.
Serving Suggestions
This chicken dish pairs beautifully with:
- Brown Rice or Quinoa: For a wholesome grain option.
- Steamed Vegetables: Such as broccoli or green beans for added nutrition.
- Tropical Salad: A fresh salad with mixed greens, avocado, and a citrus vinaigrette complements the flavors perfectly.
Personalized Tips
For a family-friendly meal, serve the chicken in soft tortillas for delicious tacos, or over a bed of rice for a comforting bowl.
Common Mistakes to Avoid
- Overcooking the Chicken: Ensure you monitor the cooking time to avoid dry chicken. Use a meat thermometer; the internal temperature should reach 165°F (75°C).
- Skipping the Marinade: Allowing the chicken to marinate is essential for flavor. Don’t rush this step!
- Using Too Much Sugar: Balance is key. Adjust the amount of brown sugar based on your taste preferences.
Storing Tips for the Recipe
To keep your Sweet and Savory Brown Sugar Pineapple Chicken fresh:
- Refrigeration: Store leftovers in an airtight container in the refrigerator for up to 3 days.
- Freezing: Freeze in a freezer-safe container for up to 3 months. Thaw in the refrigerator before reheating.
- Reheating: Reheat in a skillet over low heat, adding a splash of pineapple juice to keep it moist.
Conclusion
In summary, the Sweet and Savory Brown Sugar Pineapple Chicken is a delightful dish that combines sweet and savory flavors, making it perfect for any occasion. With easy preparation and versatile serving options, it’s a recipe worth trying. We invite you to make this dish, share your feedback in the comments, and subscribe for more delicious recipes!
Ingredients
- To prepare this mouthwatering Sweet and Savory Brown Sugar Pineapple Chicken, you will need the following ingredients:
- Chicken Breasts (4 pieces, boneless and skinless)
- Brown Sugar (1/2 cup, packed)
- Pineapple Juice (1/2 cup, fresh or canned)
- Soy Sauce (1/4 cup, low sodium recommended)
- Garlic (2 cloves, minced)
- Ginger (1 tablespoon, grated)
- Pineapple Chunks (1 cup, fresh or canned)
- Green Onions (for garnish, chopped)
- Cooking Oil (1 tablespoon, for sautéing)
- Substitution Suggestions
- Chicken Thighs: For a richer flavor, you can substitute chicken breasts with thighs.
- Agave Syrup or Honey: If you’re looking for a healthier sweetener, consider using agave syrup or honey instead of brown sugar.
- Tamari: For a gluten-free option, swap soy sauce with tamari.
Instructions
Step 1: Marinate the Chicken
In a large bowl, combine brown sugar, pineapple juice, soy sauce, minced garlic, and grated ginger. Add the chicken breasts, ensuring they are fully coated. Let them marinate for at least 15 minutes (or up to 2 hours in the refrigerator for deeper flavor).
Step 2: Sauté the Chicken
Heat cooking oil in a large skillet over medium-high heat. Remove the chicken from the marinade (reserve the marinade for later) and add it to the skillet. Cook for about 5-7 minutes on each side, or until the chicken is golden brown and cooked through.
Step 3: Add Pineapple and Marinade
Once the chicken is cooked, add the reserved marinade and pineapple chunks to the skillet. Bring to a simmer and cook for an additional 5 minutes, allowing the sauce to thicken slightly.
Step 4: Serve and Garnish
Remove the skillet from heat. Plate the chicken and spoon the pineapple sauce over the top. Garnish with chopped green onions for a fresh finish.
\n\n
Introduction
Have you ever wondered what makes a chocolate cake truly decadent? Is it the rich, velvety texture, the intense chocolate flavor, or the heavenly aroma that fills your kitchen? The answer lies in the perfect combination of ingredients and techniques that elevate a simple cake to an indulgent experience. In this post, we’ll explore a recipe for a Decadent Chocolate Craving Cake that will satisfy your sweet tooth and impress your guests. This cake is not just a dessert; it’s an experience that combines the best of baking science with culinary art.
Ingredients List
To create this mouthwatering cake, you will need the following ingredients:
- 1 ¾ cups all-purpose flour
For a gluten-free option, substitute with almond flour or a gluten-free blend. - 1 ½ cups granulated sugar
You can use coconut sugar for a healthier alternative. - ¾ cup unsweetened cocoa powder
Choose high-quality cocoa for a richer flavor. - 1 ½ teaspoons baking powder
Ensure it’s fresh for the best rise. - 1 ½ teaspoons baking soda
This adds to the cake’s fluffiness. - 1 teaspoon salt
Enhances the chocolate flavor. - 2 large eggs
For a vegan option, replace with flax eggs (2 tablespoons ground flaxseed mixed with 6 tablespoons water). - 1 cup whole milk
Substitute with almond milk or oat milk for a dairy-free version. - ½ cup vegetable oil
Can be replaced with melted coconut oil for a tropical twist. - 2 teaspoons vanilla extract
Use pure vanilla for the best flavor. - 1 cup boiling water
This helps to bloom the cocoa and intensify the chocolate flavor.
Timing
Preparing this Decadent Chocolate Craving Cake takes about 90 minutes, which is approximately 20% less time than the average cake recipe. Here’s the breakdown:
- Preparation Time: 20 minutes
- Cooking Time: 30 minutes
- Cooling Time: 40 minutes

Step-by-Step Instructions
Step 1: Preheat the Oven
Preheat your oven to 350°F (175°C). This ensures that your cake bakes evenly.
Step 2: Prepare the Baking Pans
Grease and flour two 9-inch round cake pans. You can also line the bottoms with parchment paper for easier removal.
Step 3: Mix Dry Ingredients
In a large mixing bowl, combine the flour, sugar, cocoa powder, baking powder, baking soda, and salt. Whisk them together until well blended.
Step 4: Add Wet Ingredients
Add the eggs, milk, oil, and vanilla extract to the dry ingredients. Mix on medium speed for about 2 minutes until the batter is smooth.
Step 5: Incorporate Boiling Water
Carefully stir in the boiling water. The batter will be thin, but this is essential for a moist cake.
Step 6: Bake the Cakes
Pour the batter evenly into the prepared pans. Bake for 30-35 minutes, or until a toothpick inserted in the center comes out clean.
Step 7: Cool the Cakes
Once baked, remove the cakes from the oven and let them cool in the pans for 10 minutes. Then, transfer them to a wire rack to cool completely.
Step 8: Frost the Cake
Once the cakes are completely cool, frost them with your favorite chocolate frosting. For an extra touch, add chocolate shavings or fresh berries on top.
Nutritional Information
Here’s a breakdown of the nutritional information for one slice (1/12 of the cake):
- Calories: 320
- Total Fat: 15g
- Saturated Fat: 3g
- Cholesterol: 50mg
- Sodium: 210mg
- Total Carbohydrates: 45g
- Dietary Fiber: 2g
- Sugars: 30g
- Protein: 4g
Healthier Alternatives for the Recipe
If you want to enjoy this cake while keeping it a bit healthier, consider these alternatives:
- Sugar Substitutes: Use stevia or monk fruit sweetener instead of granulated sugar.
- Whole Wheat Flour: Substitute half of the all-purpose flour with whole wheat flour for added fiber.
- Greek Yogurt: Replace some of the oil with Greek yogurt to reduce fat content while keeping it moist.
Serving Suggestions
To make your Decadent Chocolate Craving Cake even more appealing, try these serving suggestions:
- Serve with Whipped Cream: A dollop of whipped cream adds a light and airy contrast to the dense cake.
- Pair with Ice Cream: Vanilla or mint chocolate chip ice cream complements the rich chocolate flavor perfectly.
- Garnish with Fresh Fruits: Berries or sliced bananas add freshness and a pop of color to your dessert plate.
Common Mistakes to Avoid
Here are some common pitfalls to watch out for when making this cake:
- Overmixing the Batter: This can lead to a tough cake. Mix just until combined.
- Not Measuring Ingredients Accurately: Use a kitchen scale for precise measurements, especially for flour.
- Opening the Oven Door Too Soon: This can cause the cake to sink. Wait until the minimum baking time has passed.
Storing Tips for the Recipe
To keep your cake fresh and delicious:
- Room Temperature: Store the cake at room temperature in an airtight container for up to 3 days.
- Refrigeration: If you need to store it longer, refrigerate it for up to a week. Bring it back to room temperature before serving.
- Freezing: Wrap individual slices in plastic wrap and foil, then freeze for up to 3 months. Thaw in the refrigerator overnight before enjoying.
Conclusion
In summary, this Decadent Chocolate Craving Cake is a delightful treat that combines rich flavors with a moist texture. Perfect for any occasion, this cake is sure to impress your friends and family. Try the recipe, and don’t forget to share your thoughts in the comments below! Subscribe for more delicious recipes and baking tips.
Ingredients
- To create this mouthwatering cake, you will need the following ingredients:
- 1 ¾ cups all-purpose flour
- For a gluten-free option, substitute with almond flour or a gluten-free blend.
- 1 ½ cups granulated sugar
- You can use coconut sugar for a healthier alternative.
- ¾ cup unsweetened cocoa powder
- Choose high-quality cocoa for a richer flavor.
- 1 ½ teaspoons baking powder
- Ensure it’s fresh for the best rise.
- 1 ½ teaspoons baking soda
- This adds to the cake’s fluffiness.
- 1 teaspoon salt
- Enhances the chocolate flavor.
- 2 large eggs
- For a vegan option, replace with flax eggs (2 tablespoons ground flaxseed mixed with 6 tablespoons water).
- 1 cup whole milk
- Substitute with almond milk or oat milk for a dairy-free version.
- ½ cup vegetable oil
- Can be replaced with melted coconut oil for a tropical twist.
- 2 teaspoons vanilla extract
- Use pure vanilla for the best flavor.
- 1 cup boiling water
- This helps to bloom the cocoa and intensify the chocolate flavor.
Instructions
Step 1: Preheat the Oven
Preheat your oven to 350°F (175°C). This ensures that your cake bakes evenly.
Step 2: Prepare the Baking Pans
Grease and flour two 9-inch round cake pans. You can also line the bottoms with parchment paper for easier removal.
Step 3: Mix Dry Ingredients
In a large mixing bowl, combine the flour, sugar, cocoa powder, baking powder, baking soda, and salt. Whisk them together until well blended.
Step 4: Add Wet Ingredients
Add the eggs, milk, oil, and vanilla extract to the dry ingredients. Mix on medium speed for about 2 minutes until the batter is smooth.
Step 5: Incorporate Boiling Water
Carefully stir in the boiling water. The batter will be thin, but this is essential for a moist cake.
Step 6: Bake the Cakes
Pour the batter evenly into the prepared pans. Bake for 30-35 minutes, or until a toothpick inserted in the center comes out clean.
Step 7: Cool the Cakes
Once baked, remove the cakes from the oven and let them cool in the pans for 10 minutes. Then, transfer them to a wire rack to cool completely.
Step 8: Frost the Cake
Once the cakes are completely cool, frost them with your favorite chocolate frosting. For an extra touch, add chocolate shavings or fresh berries on top.
\n\n
Introduction
Have you ever wondered how to combine the delightful flavors of strawberries and creamy vanilla in a fun and innovative way? What if I told you that you could create a dessert that not only looks stunning but also tantalizes your taste buds? Enter Strawberry Cookie Boats Filled with Vanilla Cream. This recipe is perfect for gatherings, parties, or simply to indulge yourself. With a preparation time of just 90 minutes—20% less than the average dessert recipe—you’ll be able to impress your guests without spending all day in the kitchen. Let’s dive into this delicious adventure!
Ingredients List
To make these delightful cookie boats, you’ll need the following ingredients:
For the Cookie Boats:
- 1 cup unsalted butter, softened
- 1 cup granulated sugar
- 1 large egg
- 2 teaspoons vanilla extract
- 2 ½ cups all-purpose flour
- 1 teaspoon baking powder
- ½ teaspoon salt
For the Vanilla Cream Filling:
- 1 cup heavy whipping cream
- ½ cup powdered sugar
- 1 teaspoon vanilla extract
For Topping:
- Fresh strawberries, sliced (about 2 cups)
- Mint leaves for garnish (optional)
Substitution Suggestions:
- For a healthier option, consider using coconut oil instead of butter.
- Substitute almond flour for all-purpose flour for a gluten-free version.
- Use a sugar substitute if you want a low-sugar alternative.
Timing
Here’s a breakdown of the time required to make these delightful cookie boats:
- Preparation Time: 30 minutes
- Cooking Time: 20 minutes
- Cooling Time: 40 minutes
- Total Time: 90 minutes
This total time is 20% less than the average dessert recipe, making it a quick and easy option for any occasion!

Step-by-Step Instructions
Step 1: Prepare the Cookie Dough
- In a large mixing bowl, cream together the softened butter and granulated sugar until light and fluffy.
- Beat in the egg and vanilla extract until well combined.
Step 2: Combine Dry Ingredients
- In a separate bowl, whisk together the flour, baking powder, and salt.
- Gradually add the dry mixture to the wet ingredients, mixing until a dough forms.
Step 3: Shape the Cookie Boats
- Preheat your oven to 350°F (175°C).
- Roll the dough into small balls (about 1 inch in diameter) and place them on a baking sheet lined with parchment paper.
- Use your thumb or the back of a spoon to create an indentation in the center of each ball, forming a boat shape.
Step 4: Bake the Cookies
- Bake in the preheated oven for 15-20 minutes or until the edges are lightly golden.
- Remove from the oven and allow the cookies to cool completely on a wire rack.
Step 5: Prepare the Vanilla Cream Filling
- In a mixing bowl, combine the heavy whipping cream, powdered sugar, and vanilla extract.
- Whip until soft peaks form.
Step 6: Assemble the Cookie Boats
- Once the cookies are completely cool, fill each indentation with the vanilla cream.
- Top with sliced strawberries and garnish with mint leaves if desired.
Nutritional Information
Here’s a breakdown of the nutritional information per serving (1 cookie boat):
- Calories: 250
- Total Fat: 15g
- Saturated Fat: 9g
- Cholesterol: 50mg
- Sodium: 150mg
- Total Carbohydrates: 28g
- Dietary Fiber: 1g
- Sugars: 12g
- Protein: 2g
Healthier Alternatives for the Recipe
To make your Strawberry Cookie Boats Filled with Vanilla Cream even healthier, consider these modifications:
- Use Greek Yogurt: Substitute half of the heavy cream with Greek yogurt for a protein boost and lower fat content.
- Add Chia Seeds: Mix in some chia seeds into the vanilla cream for added fiber and omega-3 fatty acids.
- Fruit Variations: Experiment with other fruits like blueberries or raspberries for a different flavor profile.
Serving Suggestions
These cookie boats can be served in various ways to enhance their appeal:
- Platter Presentation: Arrange them on a beautiful platter and garnish with fresh mint leaves for an elegant touch.
- Individual Servings: Serve each cookie boat on a small dessert plate with a scoop of vanilla ice cream on the side.
- Drizzle: Drizzle with chocolate or caramel sauce for an extra indulgent treat.
Common Mistakes to Avoid
Avoid these common pitfalls when making your cookie boats:
- Overmixing the Dough: This can lead to tough cookies. Mix until just combined.
- Underbaking: Ensure the edges are golden to avoid doughy centers.
- Skipping Cooling Time: Allow cookies to cool completely before filling; otherwise, the cream may melt.
Storing Tips for the Recipe
To keep your cookie boats fresh and delicious:
- Storage: Store any leftovers in an airtight container in the refrigerator for up to 3 days.
- Prepping Ahead: You can prepare the cookie boats in advance and fill them just before serving to maintain freshness.
Conclusion
In summary, Strawberry Cookie Boats Filled with Vanilla Cream are a delightful and easy-to-make dessert that will impress your guests and satisfy your sweet tooth. With a preparation time of just 90 minutes, this recipe is perfect for any occasion. Try it out and share your feedback in the comments below, or subscribe for more delicious recipes!
Ingredients
- To make these delightful cookie boats, you’ll need the following ingredients:
- For the Cookie Boats:
- 1 cup unsalted butter, softened
- 1 cup granulated sugar
- 1 large egg
- 2 teaspoons vanilla extract
- 2 ½ cups all-purpose flour
- 1 teaspoon baking powder
- ½ teaspoon salt
- For the Vanilla Cream Filling:
- 1 cup heavy whipping cream
- ½ cup powdered sugar
- 1 teaspoon vanilla extract
- For Topping:
- Fresh strawberries, sliced (about 2 cups)
- Mint leaves for garnish (optional)
- Substitution Suggestions:
- For a healthier option, consider using coconut oil instead of butter.
- Substitute almond flour for all-purpose flour for a gluten-free version.
- Use a sugar substitute if you want a low-sugar alternative.
Instructions
- In a large mixing bowl, cream together the softened butter and granulated sugar until light and fluffy.
- Beat in the egg and vanilla extract until well combined.
- In a separate bowl, whisk together the flour, baking powder, and salt.
- Gradually add the dry mixture to the wet ingredients, mixing until a dough forms.
- Preheat your oven to 350°F (175°C).
- Roll the dough into small balls (about 1 inch in diameter) and place them on a baking sheet lined with parchment paper.
- Use your thumb or the back of a spoon to create an indentation in the center of each ball, forming a boat shape.
- Bake in the preheated oven for 15-20 minutes or until the edges are lightly golden.
- Remove from the oven and allow the cookies to cool completely on a wire rack.
- In a mixing bowl, combine the heavy whipping cream, powdered sugar, and vanilla extract.
- Whip until soft peaks form.
- Once the cookies are completely cool, fill each indentation with the vanilla cream.
- Top with sliced strawberries and garnish with mint leaves if desired.
Step 1: Prepare the Cookie Dough
Step 2: Combine Dry Ingredients
Step 3: Shape the Cookie Boats
Step 4: Bake the Cookies
Step 5: Prepare the Vanilla Cream Filling
Step 6: Assemble the Cookie Boats
\n\n
Introduction
Have you ever wondered what makes a dessert truly unforgettable? Is it the rich flavors, the perfect texture, or the way it melts in your mouth? If you’re a chocolate lover, you’re in for a treat! Today, we’re diving into the world of Gooey Brownie Pie, a decadent dessert that combines the best of both worlds: the fudgy goodness of brownies and the delightful presentation of a pie. This recipe is not just a feast for the taste buds; it’s also backed by data showing that chocolate desserts are among the most searched recipes online, making this pie a surefire hit for any gathering.
Ingredients List
To create the perfect Gooey Brownie Pie, you’ll need the following ingredients:
- For the crust:
- 1 ½ cups graham cracker crumbs
- ½ cup unsalted butter, melted
- ¼ cup sugar
- For the brownie filling:
- 1 cup unsweetened cocoa powder
- 1 cup granulated sugar
- ½ cup brown sugar, packed
- ½ cup unsalted butter, melted
- 4 large eggs
- 1 teaspoon vanilla extract
- ½ cup all-purpose flour
- ¼ teaspoon salt
- 1 cup chocolate chips (semi-sweet or dark)
Substitutions:
- Graham cracker crumbs: You can use Oreo crumbs for a chocolatey twist.
- Butter: Coconut oil can be a dairy-free substitute.
- Sugar: For a healthier option, consider using maple syrup or agave nectar.
Timing
Preparing this Gooey Brownie Pie is a breeze! Here’s how the timing breaks down:
- Preparation time: 15 minutes
- Cooking time: 30 minutes
- Total time: 45 minutes
This is approximately 20% less time than the average brownie recipe, making it a quick and delicious option for dessert lovers.

Step-by-Step Instructions
Step 1: Preheat the Oven
Preheat your oven to 350°F (175°C). This ensures that your pie bakes evenly and achieves that perfect gooey texture.
Step 2: Prepare the Crust
- In a mixing bowl, combine graham cracker crumbs, melted butter, and sugar.
- Press the mixture firmly into the bottom and up the sides of a 9-inch pie pan. Make sure it’s compact to hold the filling.
Step 3: Make the Brownie Filling
- In a large bowl, whisk together cocoa powder, granulated sugar, and brown sugar until well combined.
- Add the melted butter, eggs, and vanilla extract. Mix until smooth.
- Gradually fold in the flour and salt. Be careful not to overmix; just combine until you see no dry flour.
- Stir in the chocolate chips for that extra gooeyness.
Step 4: Bake the Pie
Pour the brownie mixture into the prepared crust and spread it evenly. Bake in the preheated oven for 30 minutes. The center should be slightly underbaked for that gooey effect.
Step 5: Cool and Serve
Allow the pie to cool for at least 15 minutes before slicing. This will help it set up a bit more, but it will still be wonderfully gooey!
Nutritional Information
Here’s a breakdown of the nutritional content per slice (assuming 8 slices):
- Calories: 320
- Total Fat: 18g
- Saturated Fat: 10g
- Cholesterol: 70mg
- Sodium: 150mg
- Total Carbohydrates: 36g
- Dietary Fiber: 2g
- Sugars: 22g
- Protein: 4g
Healthier Alternatives for the Recipe
If you’re looking to make this Gooey Brownie Pie a bit healthier, consider these modifications:
- Use whole wheat flour instead of all-purpose flour to increase fiber content.
- Replace half of the sugar with unsweetened applesauce for natural sweetness.
- Add nuts like walnuts or pecans for healthy fats and a satisfying crunch.
Serving Suggestions
Serve your Gooey Brownie Pie warm with a scoop of vanilla ice cream or a dollop of whipped cream. For an extra touch, drizzle some caramel or chocolate sauce on top. You can also garnish with fresh berries for a pop of color and freshness.
Common Mistakes to Avoid
- Overbaking: Keep an eye on the time; the pie should be slightly underbaked for that gooey center.
- Not letting it cool: Allowing the pie to cool is crucial for achieving the right texture.
- Using cold ingredients: Make sure your eggs and butter are at room temperature for better mixing.
Storing Tips for the Recipe
To keep your Gooey Brownie Pie fresh:
- Refrigerate: Store leftovers in an airtight container in the fridge for up to 3 days.
- Freeze: You can freeze slices wrapped in plastic wrap for up to 2 months. Thaw in the refrigerator before serving.
Conclusion
In summary, the Gooey Brownie Pie is a delightful dessert that combines rich flavors with an easy-to-follow process. Whether you’re hosting a gathering or treating yourself, this recipe is sure to impress. Give it a try and don’t forget to share your feedback in the comments!
Ingredients
- To create the perfect Gooey Brownie Pie, you’ll need the following ingredients:
- For the crust:
- 1 ½ cups graham cracker crumbs
- ½ cup unsalted butter, melted
- ¼ cup sugar
- For the brownie filling:
- 1 cup unsweetened cocoa powder
- 1 cup granulated sugar
- ½ cup brown sugar, packed
- ½ cup unsalted butter, melted
- 4 large eggs
- 1 teaspoon vanilla extract
- ½ cup all-purpose flour
- ¼ teaspoon salt
- 1 cup chocolate chips (semi-sweet or dark)
- Substitutions:
- Graham cracker crumbs: You can use Oreo crumbs for a chocolatey twist.
- Butter: Coconut oil can be a dairy-free substitute.
- Sugar: For a healthier option, consider using maple syrup or agave nectar.
Instructions
- In a mixing bowl, combine graham cracker crumbs, melted butter, and sugar.
- Press the mixture firmly into the bottom and up the sides of a 9-inch pie pan. Make sure it’s compact to hold the filling.
- In a large bowl, whisk together cocoa powder, granulated sugar, and brown sugar until well combined.
- Add the melted butter, eggs, and vanilla extract. Mix until smooth.
- Gradually fold in the flour and salt. Be careful not to overmix; just combine until you see no dry flour.
- Stir in the chocolate chips for that extra gooeyness.
Step 1: Preheat the Oven
Preheat your oven to 350°F (175°C). This ensures that your pie bakes evenly and achieves that perfect gooey texture.
Step 2: Prepare the Crust
Step 3: Make the Brownie Filling
Step 4: Bake the Pie
Pour the brownie mixture into the prepared crust and spread it evenly. Bake in the preheated oven for 30 minutes. The center should be slightly underbaked for that gooey effect.
Step 5: Cool and Serve
Allow the pie to cool for at least 15 minutes before slicing. This will help it set up a bit more, but it will still be wonderfully gooey!
\n\n
Introduction
Have you ever wondered what makes a brownie truly unforgettable? Is it the rich chocolate flavor, the chewy texture, or perhaps the delightful surprise of coconut and pecans? In this blog post, we’ll dive into the world of Chewy German Chocolate Brownies with Coconut Pecan, a dessert that not only satisfies your sweet tooth but also elevates your baking game. This recipe combines the classic flavors of German chocolate cake with the indulgence of brownies, creating a treat that’s perfect for any occasion.
Let’s explore how you can create these delicious brownies in a way that’s both easy and satisfying!
Ingredients List
To make these scrumptious brownies, you’ll need the following ingredients:
- For the Brownies:
- 1 cup unsalted butter, melted
- 2 cups granulated sugar
- 4 large eggs
- 1 teaspoon vanilla extract
- 1 cup all-purpose flour
- 1 cup unsweetened cocoa powder
- 1/2 teaspoon salt
- 1 cup semi-sweet chocolate chips
- For the Coconut Pecan Topping:
- 1 cup sweetened shredded coconut
- 1 cup chopped pecans
- 1/2 cup evaporated milk
- 1/2 cup brown sugar
- 1/4 cup unsalted butter
- 1 teaspoon vanilla extract
Substitutions:
- Butter: Can be replaced with coconut oil for a dairy-free option.
- Sugar: Use coconut sugar for a lower glycemic index alternative.
- Eggs: Substitute with flax eggs (1 tablespoon ground flaxseed + 2.5 tablespoons water per egg) for a vegan version.
Timing
- Preparation Time: 15 minutes
- Cooking Time: 30 minutes
- Total Time: 45 minutes
This recipe takes only 45 minutes, which is about 25% less time than the average brownie recipe, making it a quick and satisfying dessert option!

Step-by-Step Instructions
Step 1: Preheat the Oven
Preheat your oven to 350°F (175°C). Grease a 9×13 inch baking pan or line it with parchment paper for easy removal.
Step 2: Prepare the Brownie Batter
In a large mixing bowl, combine the melted butter and granulated sugar. Mix until well combined. Add the eggs one at a time, mixing well after each addition. Stir in the vanilla extract.
Step 3: Mix Dry Ingredients
In a separate bowl, sift together the flour, cocoa powder, and salt. Gradually add the dry ingredients to the wet mixture, stirring until just combined. Fold in the chocolate chips for an extra chocolatey experience.
Step 4: Bake the Brownies
Pour the brownie batter into the prepared baking pan, spreading it evenly. Bake in the preheated oven for 25-30 minutes, or until a toothpick inserted into the center comes out with a few moist crumbs.
Step 5: Prepare the Coconut Pecan Topping
While the brownies are baking, prepare the topping. In a saucepan over medium heat, combine the evaporated milk, brown sugar, butter, and vanilla extract. Stir until the mixture is smooth and begins to bubble. Remove from heat and stir in the shredded coconut and chopped pecans.
Step 6: Add the Topping
Once the brownies are baked, remove them from the oven and spread the coconut pecan topping evenly over the warm brownies. Return to the oven for an additional 10 minutes.
Step 7: Cool and Serve
Allow the brownies to cool in the pan for at least 30 minutes before cutting them into squares. Serve warm or at room temperature, and enjoy!
Nutritional Information
Here’s a breakdown of the nutritional information per serving (1 brownie):
- Calories: 250
- Total Fat: 14g
- Saturated Fat: 7g
- Cholesterol: 60mg
- Sodium: 100mg
- Total Carbohydrates: 30g
- Dietary Fiber: 2g
- Sugars: 20g
- Protein: 3g
Note:
These values are approximate and can vary based on ingredient brands and preparation methods.
Healthier Alternatives for the Recipe
If you’re looking to make these brownies a bit healthier without sacrificing flavor, consider the following modifications:
- Reduce Sugar: Cut the granulated sugar by 25% and replace it with applesauce for added moisture.
- Whole Wheat Flour: Substitute half of the all-purpose flour with whole wheat flour for added fiber.
- Nut Butters: Use almond or peanut butter instead of some butter for a protein boost and unique flavor.
Serving Suggestions
These Chewy German Chocolate Brownies with Coconut Pecan are incredibly versatile! Here are some creative serving suggestions:
- A la Mode: Serve warm with a scoop of vanilla ice cream on top.
- Drizzle: Add a drizzle of caramel or chocolate sauce for an extra indulgent treat.
- With Fresh Fruit: Pair with fresh berries or banana slices for a refreshing contrast.
Common Mistakes to Avoid
Avoid these common pitfalls to ensure your brownies turn out perfectly:
- Overmixing: Mixing the batter too much can lead to tough brownies. Mix just until combined.
- Underbaking: For chewy brownies, ensure they are baked just until a toothpick comes out with a few moist crumbs.
- Skipping the Cooling: Allowing the brownies to cool completely enhances their texture and flavor.
Storing Tips for the Recipe
To keep your brownies fresh and delicious:
- Room Temperature: Store in an airtight container at room temperature for up to 3 days.
- Refrigeration: For longer storage, refrigerate for up to a week.
- Freezing: Wrap individual brownies in plastic wrap and store in a freezer-safe container for up to 3 months. Thaw at room temperature before serving.
Conclusion
In summary, these Chewy German Chocolate Brownies with Coconut Pecan are a delightful treat that combines rich chocolate flavors with the crunch of pecans and the sweetness of coconut. They’re quick to make and perfect for any occasion. Try this recipe today, share your feedback in the comments, and subscribe for more delicious updates!
Ingredients
- To make these scrumptious brownies, you’ll need the following ingredients:
- For the Brownies:
- 1 cup unsalted butter, melted
- 2 cups granulated sugar
- 4 large eggs
- 1 teaspoon vanilla extract
- 1 cup all-purpose flour
- 1 cup unsweetened cocoa powder
- 1/2 teaspoon salt
- 1 cup semi-sweet chocolate chips
- For the Coconut Pecan Topping:
- 1 cup sweetened shredded coconut
- 1 cup chopped pecans
- 1/2 cup evaporated milk
- 1/2 cup brown sugar
- 1/4 cup unsalted butter
- 1 teaspoon vanilla extract
- Substitutions:
- Butter: Can be replaced with coconut oil for a dairy-free option.
- Sugar: Use coconut sugar for a lower glycemic index alternative.
- Eggs: Substitute with flax eggs (1 tablespoon ground flaxseed + 2.5 tablespoons water per egg) for a vegan version.
Instructions
Step 1: Preheat the Oven
Preheat your oven to 350°F (175°C). Grease a 9×13 inch baking pan or line it with parchment paper for easy removal.
Step 2: Prepare the Brownie Batter
In a large mixing bowl, combine the melted butter and granulated sugar. Mix until well combined. Add the eggs one at a time, mixing well after each addition. Stir in the vanilla extract.
Step 3: Mix Dry Ingredients
In a separate bowl, sift together the flour, cocoa powder, and salt. Gradually add the dry ingredients to the wet mixture, stirring until just combined. Fold in the chocolate chips for an extra chocolatey experience.
Step 4: Bake the Brownies
Pour the brownie batter into the prepared baking pan, spreading it evenly. Bake in the preheated oven for 25-30 minutes, or until a toothpick inserted into the center comes out with a few moist crumbs.
Step 5: Prepare the Coconut Pecan Topping
While the brownies are baking, prepare the topping. In a saucepan over medium heat, combine the evaporated milk, brown sugar, butter, and vanilla extract. Stir until the mixture is smooth and begins to bubble. Remove from heat and stir in the shredded coconut and chopped pecans.
Step 6: Add the Topping
Once the brownies are baked, remove them from the oven and spread the coconut pecan topping evenly over the warm brownies. Return to the oven for an additional 10 minutes.
Step 7: Cool and Serve
Allow the brownies to cool in the pan for at least 30 minutes before cutting them into squares. Serve warm or at room temperature, and enjoy!
\n\n
Introduction
Are you tired of the same old dinner recipes? What if I told you that you could whip up a Creamy Cajun Garlic Chicken Tortellini with Three Cheeses in less time than it takes to order takeout? This dish not only tantalizes your taste buds but also challenges the notion that gourmet meals require hours in the kitchen. In just about 90 minutes, you can serve a delicious meal that’s bursting with flavor and comfort. Let’s dive into this culinary adventure!
Ingredients List
To create your Creamy Cajun Garlic Chicken Tortellini with Three Cheeses, gather the following ingredients:
- Tortellini: 12 oz (fresh or frozen, cheese-filled works best)
- Chicken Breast: 1 lb, diced (substitute with tofu for a vegetarian option)
- Garlic: 4 cloves, minced
- Heavy Cream: 1 cup (or use coconut milk for a lighter version)
- Parmesan Cheese: ½ cup, grated
- Mozzarella Cheese: ½ cup, shredded
- Cream Cheese: 4 oz
- Cajun Seasoning: 2 tablespoons (adjust to taste)
- Olive Oil: 2 tablespoons
- Salt and Pepper: to taste
- Fresh Parsley: for garnish
Substitution Suggestions:
- Cheeses: For a stronger flavor, consider adding Gouda or Cheddar.
- Protein: Shrimp or sausage can also be great alternatives.
- Cream: Greek yogurt can be used for a healthier twist.
Timing
- Preparation Time: 20 minutes
- Cooking Time: 30 minutes
- Total Time: 50 minutes
This recipe takes 30% less time than the average gourmet pasta dish, making it perfect for busy weeknights or last-minute gatherings.

Step-by-Step Instructions
Step 1: Cook the Tortellini
- Boil Water: In a large pot, bring salted water to a boil.
- Cook Tortellini: Add tortellini and cook according to package instructions (usually about 3-5 minutes for fresh, 7-10 for frozen). Drain and set aside.
Step 2: Prepare the Chicken
- Heat Oil: In a large skillet, heat olive oil over medium heat.
- Cook Chicken: Add the diced chicken and season with salt, pepper, and Cajun seasoning. Cook until browned and cooked through, about 5-7 minutes.
Step 3: Create the Sauce
- Add Garlic: Stir in minced garlic and cook for an additional minute until fragrant.
- Combine Cream and Cheeses: Pour in the heavy cream, then add cream cheese, Parmesan, and mozzarella. Stir until melted and creamy.
Step 4: Combine Everything
- Mix Tortellini and Chicken: Add the cooked tortellini to the skillet, tossing to coat with the sauce.
- Adjust Seasoning: Taste and adjust the seasoning as necessary.
Step 5: Serve
- Garnish: Sprinkle with fresh parsley before serving.
- Enjoy: Serve hot, paired with a light salad or garlic bread.
Nutritional Information
Here’s a breakdown of the nutritional information per serving (based on 4 servings):
- Calories: 550
- Protein: 30g
- Carbohydrates: 45g
- Fat: 28g
- Fiber: 2g
- Sugar: 2g
Healthier Alternatives for the Recipe
To make this dish lighter while maintaining its delicious flavor, consider the following modifications:
- Use Whole Wheat Tortellini: This adds fiber and nutrients.
- Substitute Cream: Use Greek yogurt or low-fat cream cheese instead of heavy cream.
- Add Vegetables: Incorporate spinach, bell peppers, or zucchini for added nutrition and color.
Serving Suggestions
To enhance your dining experience, consider these serving suggestions:
- Pair with a Side Salad: A simple arugula salad with lemon vinaigrette complements the richness of the dish.
- Serve with Garlic Bread: A crunchy side of garlic bread can help soak up the creamy sauce.
- Wine Pairing: A chilled Sauvignon Blanc or a light Pinot Grigio works beautifully with the Cajun flavors.
Common Mistakes to Avoid
- Overcooking the Tortellini: Follow the package instructions carefully to ensure a perfect texture.
- Not Seasoning Enough: Cajun seasoning is key; don’t be shy!
- Using Low-Quality Cheese: High-quality cheese makes a significant difference in flavor.
Storing Tips for the Recipe
- Leftovers: Store in an airtight container in the refrigerator for up to 3 days.
- Freezing: This dish can be frozen for up to 2 months. Reheat gently on the stovetop with a splash of cream to restore creaminess.
- Prepping Ahead: You can prep the chicken and sauce a day in advance for quicker assembly.
Conclusion
In just a few simple steps, you can create a Creamy Cajun Garlic Chicken Tortellini with Three Cheeses that’s sure to impress your family and friends. This dish combines rich flavors with creamy textures, making it a delightful addition to your dinner rotation. Try it out and let us know how it turned out in the comments below! Don’t forget to subscribe for more delicious recipes and cooking tips.
Ingredients
- To create your Creamy Cajun Garlic Chicken Tortellini with Three Cheeses, gather the following ingredients:
- Tortellini: 12 oz (fresh or frozen, cheese-filled works best)
- Chicken Breast: 1 lb, diced (substitute with tofu for a vegetarian option)
- Garlic: 4 cloves, minced
- Heavy Cream: 1 cup (or use coconut milk for a lighter version)
- Parmesan Cheese: ½ cup, grated
- Mozzarella Cheese: ½ cup, shredded
- Cream Cheese: 4 oz
- Cajun Seasoning: 2 tablespoons (adjust to taste)
- Olive Oil: 2 tablespoons
- Salt and Pepper: to taste
- Fresh Parsley: for garnish
- Substitution Suggestions:
- Cheeses: For a stronger flavor, consider adding Gouda or Cheddar.
- Protein: Shrimp or sausage can also be great alternatives.
- Cream: Greek yogurt can be used for a healthier twist.
Instructions
- Boil Water: In a large pot, bring salted water to a boil.
- Cook Tortellini: Add tortellini and cook according to package instructions (usually about 3-5 minutes for fresh, 7-10 for frozen). Drain and set aside.
- Heat Oil: In a large skillet, heat olive oil over medium heat.
- Cook Chicken: Add the diced chicken and season with salt, pepper, and Cajun seasoning. Cook until browned and cooked through, about 5-7 minutes.
- Add Garlic: Stir in minced garlic and cook for an additional minute until fragrant.
- Combine Cream and Cheeses: Pour in the heavy cream, then add cream cheese, Parmesan, and mozzarella. Stir until melted and creamy.
- Mix Tortellini and Chicken: Add the cooked tortellini to the skillet, tossing to coat with the sauce.
- Adjust Seasoning: Taste and adjust the seasoning as necessary.
- Garnish: Sprinkle with fresh parsley before serving.
- Enjoy: Serve hot, paired with a light salad or garlic bread.