Contents
EquipmentIngredientsInstructionsStep 2: Add the Milk and WaterStep 3: Add the Oil and ButterStep 4: Adjust the Batter ConsistencyStep 5: Allow the Batter to RestStep 6: Prepare the Frying PanStep 7: Pour the Batter Into the PanStep 8: Cook the First SideStep 9: Flip the FlatbreadStep 10: Continue Cooking the Remaining BatterStep 11: Prepare the Garlic ButterStep 12: Brush the Flatbreads
Prep timearing a traditional firm dough, you make a smooth, pourable batter that
Cook time20–25 minutes
Total timeApproximately 45–55 minutes
Servingsalongside your favorite meals. Whether you call them homemade skillet flatbreads, soft batter tortillas, or easy no-knead pan breads, this recipe is a wonderful addition to your everyday
Equipment
- One large mixing bowl
- A medium-sized whisk
- Measuring cups and spoons
- A nonstick frying pan or skillet
- A ladle or large spoon
- A flat spatula
- A small bowl for melted butter
- A kitchen brush
- A plate for stacking the cooked flatbreads
Ingredients
- 2 cups all-purpose flour
- 1½ cups warm milk
- ½ cup warm water
- 2 tablespoons vegetable oil
- 1 tablespoon melted butter
- 1 teaspoon baking powder
- ½ teaspoon baking soda
- 1 teaspoon salt
- 1 teaspoon sugar
- ½ teaspoon garlic powder (optional)
- 2 tablespoons finely chopped fresh parsley or coriander (optional)
- 1–2 tablespoons vegetable oil
- 2 tablespoons melted butter
- A little extra flour, if needed to adjust the consistency
- 3 tablespoons melted butter
- 1 tablespoon olive oil
- ½ teaspoon garlic powder (optional)
- 1 tablespoon finely chopped fresh parsley (optional)
Advertisement
Instructions
Step 2: Add the Milk and Water
- Slowly pour the warm milk into the bowl while whisking continuously.
- Add the warm water gradually, mixing after each addition.
- At first, the mixture may appear thick and slightly lumpy. Continue whisking until the flour begins to absorb the liquid.
- The goal is to create a smooth batter without dry pockets of flour.
- Avoid adding all the liquid too quickly because gradual mixing makes it easier to control the consistency.
- The batter should eventually become smooth, creamy, and pourable.
Step 3: Add the Oil and Butter
- Pour in the vegetable oil and melted butter.
- Whisk again until both ingredients are completely incorporated.
- The oil helps keep the flatbreads tender, while the butter adds a pleasant richness and homemade flavor.
- If you are preparing a savory version, add finely chopped parsley or coriander at this stage.
- Mix gently until the herbs are evenly distributed.
Step 4: Adjust the Batter Consistency
- Check the consistency of your batter carefully.
- It should be thinner than traditional bread dough but slightly thicker than ordinary pancake batter.
- When you lift the whisk, the batter should flow smoothly back into the bowl.
- If the batter is too thick, add one tablespoon of water at a time.
- If it is too thin, add one tablespoon of flour and whisk until incorporated.
- The correct consistency is important because it determines how easily the batter spreads in the frying pan.
- A batter that is too thick may produce heavy flatbreads, while an excessively thin batter may become difficult to handle.
Step 5: Allow the Batter to Rest
- Cover the mixing bowl with a clean kitchen towel or plate.
- Allow the batter to rest for approximately 10–15 minutes.
- This resting period gives the flour time to absorb the liquid properly and helps create a smoother mixture.
- During this time, the batter may become slightly thicker.
- Give it a gentle stir before cooking.
- Do not worry if you notice a few small bubbles on the surface. They are normal and can help create a lighter texture.
Step 6: Prepare the Frying Pan
- Place a nonstick frying pan or skillet over medium-low heat.
- Allow it to warm gradually.
- Add a small amount of vegetable oil and spread it across the cooking surface using a brush or paper towel.
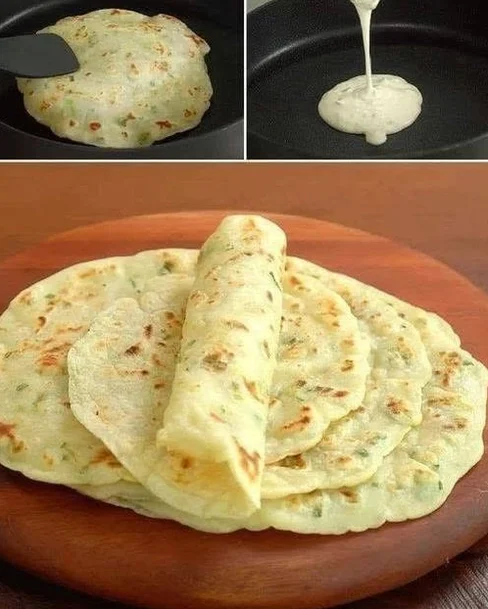
- You only need a thin coating of oil. Too much oil can make the flatbreads greasy instead of giving them the soft, lightly toasted finish shown in the picture.
- Make sure the pan is evenly heated before adding the batter.
- A properly heated pan helps the flatbread cook evenly without burning its surface.
Step 7: Pour the Batter Into the Pan
- Take a ladle and scoop up some prepared batter.
- Pour it into the center of the warm frying pan.
- Allow the batter to spread naturally into a round shape.
- You can gently tilt the pan from side to side to help the mixture spread evenly.
- Try to make each flatbread approximately the same thickness.
- Avoid making the flatbread too thick because the center may take longer to cook.
- Likewise, do not spread it too thinly if you want a soft and fluffy result.
- The ideal thickness is similar to a slightly thick homemade pancake.
Step 8: Cook the First Side
- Allow the flatbread to cook over medium-low heat.
- As it cooks, the bottom will gradually become firm and develop light golden-brown patches.
- Small bubbles may appear across the surface.
- The edges will begin to look slightly dry and set.
- This is a good indication that the flatbread is becoming ready to turn.
- Do not rush this process by using very high heat. High temperatures can brown the outside before the inside has cooked properly.
Step 9: Flip the Flatbread
- Once the first side is sufficiently cooked, carefully slide a flat spatula underneath the bread.
- Lift it gently and turn it over.
- The cooked surface should have attractive golden spots, similar to the flatbreads in the photograph.
- Cook the second side until it is lightly browned and completely set.
- The second side may cook slightly faster than the first, so keep an eye on it.
- Transfer the finished flatbread to a clean plate.
Step 10: Continue Cooking the Remaining Batter
- Repeat the same process with the remaining batter.
- Before pouring each new portion, gently stir the mixture to redistribute any ingredients that may have settled.
- Add a little oil to the pan whenever necessary.
- Continue cooking until all the batter has been used.
- As the flatbreads finish cooking, stack them on top of one another.
- Stacking the warm breads helps them retain moisture and remain soft.
Step 11: Prepare the Garlic Butter
- For an extra delicious finish, prepare a simple garlic butter mixture.
- Place the melted butter in a small bowl.
- Add the olive oil and garlic powder.
- Stir until everything is evenly combined.
- If desired, add finely chopped fresh parsley or coriander.
- This mixture adds a beautiful savory aroma and makes the flatbreads taste even better.
Step 12: Brush the Flatbreads
- While the flatbreads are still warm, lightly brush their surfaces with the prepared garlic butter.
- You can brush only the top flatbread or lightly coat each one as you stack them.
- Avoid using too much butter because a thin coating is enough to add flavor without making the breads heavy.
- Allow the flatbreads to rest for a few minutes before serving.
- They should be soft, flexible, lightly golden, and easy to roll.
Advertisement
Advertisement